
Building an Electric Guitar Kit: 7 Easy Steps
Have you ever found yourself looking at a guitar in a shop window and thinking, “Wow, I wish I had one like that, but with that pick-up, that bridge, and maybe that color that no one makes”? Or, more simply, have you told yourself that spending hundreds or thousands of euros on an instrument seems a bit too much, when after all you have two hands and a bit of good will? I understand you very well. I too, the first time I thought of build a guitar kit electric, I had a lot of questions and, let's face it, a fair amount of fear of making a mess.
But you know what? I did it. And I'm not a professional luthier; I'm someone who learned through trial and error, in the garage, amidst sawdust and botched soldering. The message is simple: if I could do it, with a little patience and the right tips, you can too. A kit is the ideal starting point for those who want to enter the world of DIY lutherie without having to immediately tackle woodworking from scratch. It's a project that will bring you enormous satisfaction, I guarantee it.
I've put together this 7-step guide, drawing on what I've learned and all those questions you see all the time on forums and Reddit. Those common fears, like "what if I ruin the finish?" or "how do I solder everything together without making a mess?" You'll see, it's easier than you think.
1. Choosing the right kit: it's not just a question of price
.biafax-photo-grid { display: grid !important; gap: 12px; margin: 24px 0; }
.biafax-photo-grid-3v { grid-template-columns: repeat(3, 1fr) !important; }
.biafax-photo-grid-2h { grid-template-columns: repeat(2, 1fr) !important; }
.biafax-photo-grid a { display: block; overflow: hidden; border-radius: 6px; line-height: 0; }
.biafax-photo-grid img { width: 100%; height: 100%; object-fit: cover; aspect ratio: 4 / 3; transition: transform 0.3s ease; }
.biafax-photo-grid a:hover img { transform: scale(1.03); }
.biafax-photo-grid br { display: none; }
.biafax-photo-grid-caption { text-align: center; font-style: italic; color: #555; margin: -12px 0 24px; }
.biafax-lightbox-overlay { position: fixed; inset: 0; background: rgba(0,0,0,0.92); display: flex; align-items: center; justify-content: center; z-index: 99999; cursor: zoom-out; }
.biafax-lightbox-overlay img { max-width: 92vw; max-height: 92vh; object-fit: contain; border-radius: 4px; }
@media (max-width: 768px) {
.biafax-photo-grid-3v { grid-template-columns: 1fr !important; }
.biafax-photo-grid-2h { grid-template-columns: 1fr !important; }
}
(function() {
if (window.biafaxGridLightbox) return;
window.biafaxGridLightbox = true;
document.addEventListener(‘click’, function(e) {
var a = e.target.closest(‘a[data-lightbox]’);
if (!a) return;
e.preventDefault();
var overlay = document.createElement(‘div’);
overlay.className = 'biafax-lightbox-overlay';
overlay.innerHTML = '‘‘';
document.body.appendChild(overlay);
overlay.addEventListener(‘click’, function() { overlay.remove(); });
document.addEventListener(‘keydown’, function handler(ev) {
if (ev.key === 'Escape') { overlay.remove(); document.removeEventListener('keydown', handler); }
});
});
})();
In this gallery: preparation, body and electrical.
.biafax-photo-grid { display: grid !important; gap: 12px; margin: 24px 0; }
.biafax-photo-grid-3v { grid-template-columns: repeat(3, 1fr) !important; }
.biafax-photo-grid-2h { grid-template-columns: repeat(2, 1fr) !important; }
.biafax-photo-grid a { display: block; overflow: hidden; border-radius: 6px; line-height: 0; }
.biafax-photo-grid img { width: 100%; height: 100%; object-fit: cover; aspect ratio: 4 / 3; transition: transform 0.3s ease; }
.biafax-photo-grid a:hover img { transform: scale(1.03); }
.biafax-photo-grid br { display: none; }
.biafax-photo-grid-caption { text-align: center; font-style: italic; color: #555; margin: -12px 0 24px; }
.biafax-lightbox-overlay { position: fixed; inset: 0; background: rgba(0,0,0,0.92); display: flex; align-items: center; justify-content: center; z-index: 99999; cursor: zoom-out; }
.biafax-lightbox-overlay img { max-width: 92vw; max-height: 92vh; object-fit: contain; border-radius: 4px; }
@media (max-width: 768px) {
.biafax-photo-grid-3v { grid-template-columns: 1fr !important; }
.biafax-photo-grid-2h { grid-template-columns: 1fr !important; }
}
(function() {
if (window.biafaxGridLightbox) return;
window.biafaxGridLightbox = true;
document.addEventListener(‘click’, function(e) {
var a = e.target.closest(‘a[data-lightbox]’);
if (!a) return;
e.preventDefault();
var overlay = document.createElement(‘div’);
overlay.className = 'biafax-lightbox-overlay';
overlay.innerHTML = '‘‘';
document.body.appendChild(overlay);
overlay.addEventListener(‘click’, function() { overlay.remove(); });
document.addEventListener(‘keydown’, function handler(ev) {
if (ev.key === 'Escape') { overlay.remove(); document.removeEventListener('keydown', handler); }
});
});
})();
In this gallery: preparation, body and electrical.
The first, fundamental step for assemble a guitar kit It's about choosing the kit itself. And here, be careful: don't be fooled by the price alone. Sure, a cheap kit can be a good gym, but a minimum of quality will save you a lot of frustration.
When it comes to kits, there are a few factors to consider. The type of wood is the first. You can find kits in basswood, mahogany, ash, and alder. Each has its own sound and workmanship characteristics. Basswood is lightweight and easy to work with, but its sound is a bit neutral. Mahogany is heavier and resonant, great for warm, full-bodied sounds, but more difficult to finish. Ash and alder are classic Fender woods, balanced and with good attack.
Then there's the neck type: bolt-on, set-neck, or neck-through. The bolt-on is the most common in kits, easy to assemble and adjust. The set-neck is more complex, requires good gluing, and doesn't allow for future adjustments to the joint. The neck-through is rare in kits because the entire body and neck are a single piece, but it offers maximum sustain and stability. To start, a good bolt-on is the wisest choice.
Another crucial point is the quality of the hardware and electronics included. Entry-level kits often have very basic tuners, bridges, and pickups. This isn't necessarily a bad thing. It allows you to focus on building and, in the future, if you get passionate about it, you can always upgrade. In fact, I'll tell you, my first kit had such poor pickups that I quickly learned the art of modify a guitar, replacing them with something more decent. It's a great way to customize your instrument and really understand how each component affects the sound.
Hobbyist's Pain Point: The fear of choosing the “wrong” kit that turns out to be impossible to assemble or that sounds pitiful.
My advice: Don't go for the absolute cheapest. Check out reviews and search YouTube for videos of people who've assembled that specific kit. Brands like Harley Benton (Thomann), Fretwire, and similar offer good value starter kits. Make sure the body is one piece or two pieces at most, not three or more, which often indicates lower-quality woods.
Checklist for choosing the kit: Guitar Type: Strat, Tele, LP, SG? Choose the one you like best and that suits your style.
Body wood: Basswood, alder, ash, mahogany? Consider the sound and ease of finishing.
Neck wood and fingerboard: Maple, rosewood, laurel? They affect the feel and a little the sound.
Handle joint type: Bolt-on to start is ideal.
Pickup configuration: Single coil, humbucker, HSS? Decide based on the genres you want to play.
Hardware included: Is this acceptable or are you already planning an upgrade?
Reviews: Read and watch videos from other builders.
Remember, this is your project. Choose a kit that inspires you and makes you want to get started.
2. Inspection and preparation: the first real "job"“
Once your kit arrives, the temptation is to unpack everything and start assembling right away. Hold on! This is one of the most critical moments, and a thorough inspection will save you from a lot of future headaches.
The big unboxing:
Open the box carefully. Take out each piece and inspect it carefully. Look for cracks in the wood, dents, or milling defects on the body or neck. Check the neck pocket: the neck should fit without excessive play, but also without having to force it too hard. If the neck wobbles, you'll have stability and sustain issues. If it's too tight, you may need to sand the edges a bit, but do so with extreme caution.
Dry fit: the dress rehearsal:
Assemble the kit “dry”, without glue
These are the final screws. Screw on the neck, rest the bridge (don't screw it in yet!), and position the pickups. Check the alignment. The strings, once installed, should pass centrally over the pickup pole pieces and the fretboard. If you notice that the neck is crooked or the bridge is off-axis, it's best to address it now while you still have time to correct it. Sometimes a slight shift of the neck in the pocket is enough to fix it.
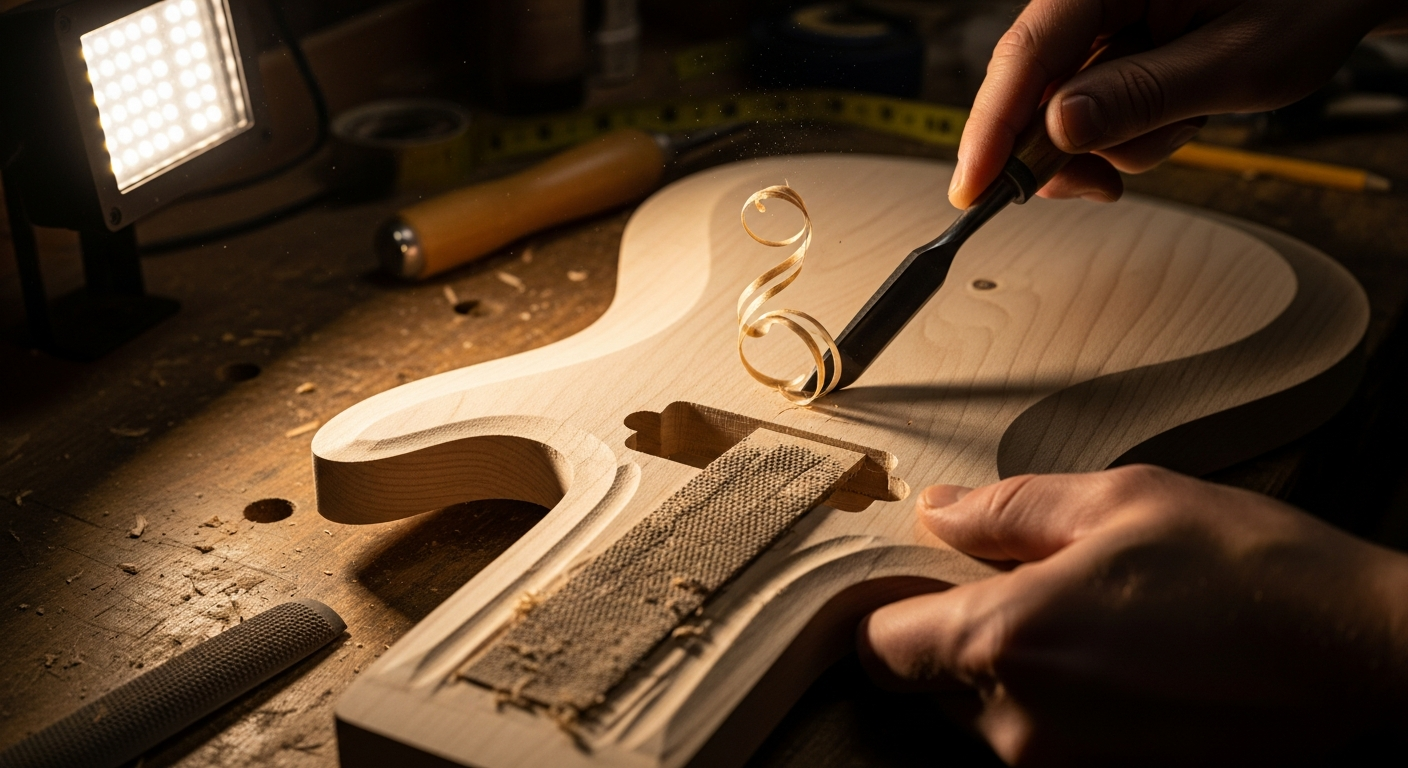
Sanding: the basis of everything:
This is the step that many overlook, but believe me, it's the one that makes the difference between a "passable" finish and one that will make you say "wow." Kits, even good quality ones, arrive with industrial sanding that is almost always insufficient. The wood still has signs of workmanship, scratches, or raised grain.
You need to sand All: body, neck (if not already finished), headstock.
Start with a medium grit, like P180 or P220, to remove the largest defects. Then, move on to P320, P400, and if you want a really smooth finish, even P600. The goal is to have a silky-smooth surface, without the slightest mark.
Why is it so important? Every scratch, every imperfection you see now will be amplified by the finish. Paint doesn't hide flaws, it accentuates them.
My typical mistake: The first time I thought the paint would cover the small marks. The result? A mirror-like finish that reflected every single scratch I'd left. Don't do it!
Practical tips for sanding: Use a sanding block: Never sand with your hands alone. A block (even a flat piece of wood) distributes the pressure evenly and prevents dips.
Sand with the grain: Always. Going against the grain creates deep scratches that are difficult to remove.
Clean the dust: After each grain pass, clean the surface thoroughly with a tack cloth or a slightly damp microfiber cloth. Dust from the previous grain can create new scratches.
Check under grazing light: Here's the trick. Hold the body or neck so that the raking light highlights every imperfection. You'll see things you wouldn't notice with normal light.
Grain filling (if needed):
If you've chosen an open-pore wood like mahogany or ash, you may want to apply a grain filler. This product fills the wood's pores, creating a perfectly smooth surface for the finish. If you skip it, the finish will have an "orange peel" appearance or the pores will be visible. It's an extra step, but for certain woods, it's almost mandatory for a professional result. Apply the filler, let it dry, and then sand the excess until it's just in the pores.
Keyword variations: “preparing a guitar kit”, “assembling a guitar from scratch”, “preparing the guitar body”.
3. The finish: the moment of truth (and mistakes!)
Here we come to the point where many hobbyists tremble: the finishing. This is where your building a pre-assembled model It comes to life visually. And yes, this is also where mistakes can be most obvious. But with patience and the right tricks, you can achieve incredible results.
There are several finishing options, each with its own pros and cons:
Polyurethane varnish (Poly): It's the most durable, modern, and easy to apply for a beginner (often in a spray can). It dries quickly, but it's also the thickest and can somewhat muffle the sound, according to some. However, for a kit, it's a solid choice.
Nitrocellulose varnish (Nitro): The classic vintage finish. Thin, it "breathes" with the wood, and ages well (cracking). But it's more delicate, requiring many thin coats and very long drying times (weeks, sometimes months, for complete cure). It also smells awful and requires a good protective mask.
Oil/Wax: For a more natural look and feel of wood. Easy to apply and easy to repair. It doesn't offer the same impact and moisture protection as a varnish, but it allows the wood to resonate. Excellent for handles. Products like Tru-Oil are popular.
My first approach: I tried nitro on a cheap kit. I messed up the dripping and discovered that patience wasn't my strong point at the time. Then I switched to spray polyurethane and realized that simplicity pays off when starting out.
Finishing process (generic, for polyurethane/nitro):
1. Sealer (insulator): After sanding and cleaning, the first step is to apply a sealer. This seals any remaining pores, evens out paint absorption, and creates a base for better paint adhesion. Two or three light coats are sufficient. Let dry thoroughly between coats. Color coats (if not transparent): If you want a solid color, now is the time. Apply thin, even coats. It's better to do 5-6 very light coats than 2-3 thick, runny coats. Maintain a consistent distance from the surface (about 20-30 cm for spray cans) and move the can smoothly and continuously. 3. Clear coats (transparent): This is the part that will provide depth and protection. Again, apply thin coats. Lots of them. For a long-lasting finish, you may need 8-12 coats of clear coat, depending on the type of paint and your goal. Between coats, if the surface feels a little rough (orange peel), you can lightly sand with a very fine grit (P800-P1000) to smooth it out, but only after the paint is completely dry. Don't overdo it, or you risk exposing the color! 4. Curing (drying and polymerization): This is the hardest part: waiting. The paint needs time to dry completely and cure. For polyurethane, a few days is enough before starting polishing. For nitro, we're talking weeks, even a month, to be safe. If you polish too soon, the paint may stretch or become dull after a short time. Wet sanding and polishing: Once the paint is completely dry, you can begin sanding the surface to achieve that mirror-like finish. Start with fine-grit sandpaper, such as P1000, P1200, P1500, P2000, P2500, or P3000. Use soap and water (or a specialized lubricant) to sand each time. Water prevents dust buildup and overheating. The goal is to remove all sanding marks from the previous grit. Then, move on to different grits of polishing compounds, using a clean microfiber cloth or a polishing machine. The end result will be a glass-smooth surface.
Hobbyist's Pain Point: The fear of dripping, of not getting a smooth surface, of ruining all the sanding work.
My advice: Patience is your best friend. Apply thin coats. Allow for drying time. And above all: test on a scrap piece! If you have a scrap of wood left over, or even the box lid, try it there before applying it to the guitar body. It'll give you a good idea of how the paint will react.
Warnings: Ventilation: Always work in a well-ventilated area, preferably outdoors or with an extractor.
Protective mask: Wear a mask with organic vapor filters. Paints are toxic.
Gloves: Protect your hands.
Hang the bodysuit: Build a simple stand to hang the body and neck, so you can paint them from all sides without touching them.
Keyword variations: “painting a guitar kit”, “finishing your own guitar”, “do it yourself guitar finish”.
“I tried nitro, and yes, it stinks and takes patience. My first experiment with spray paint ended up with drips everywhere. Don't give up, you'll learn!”
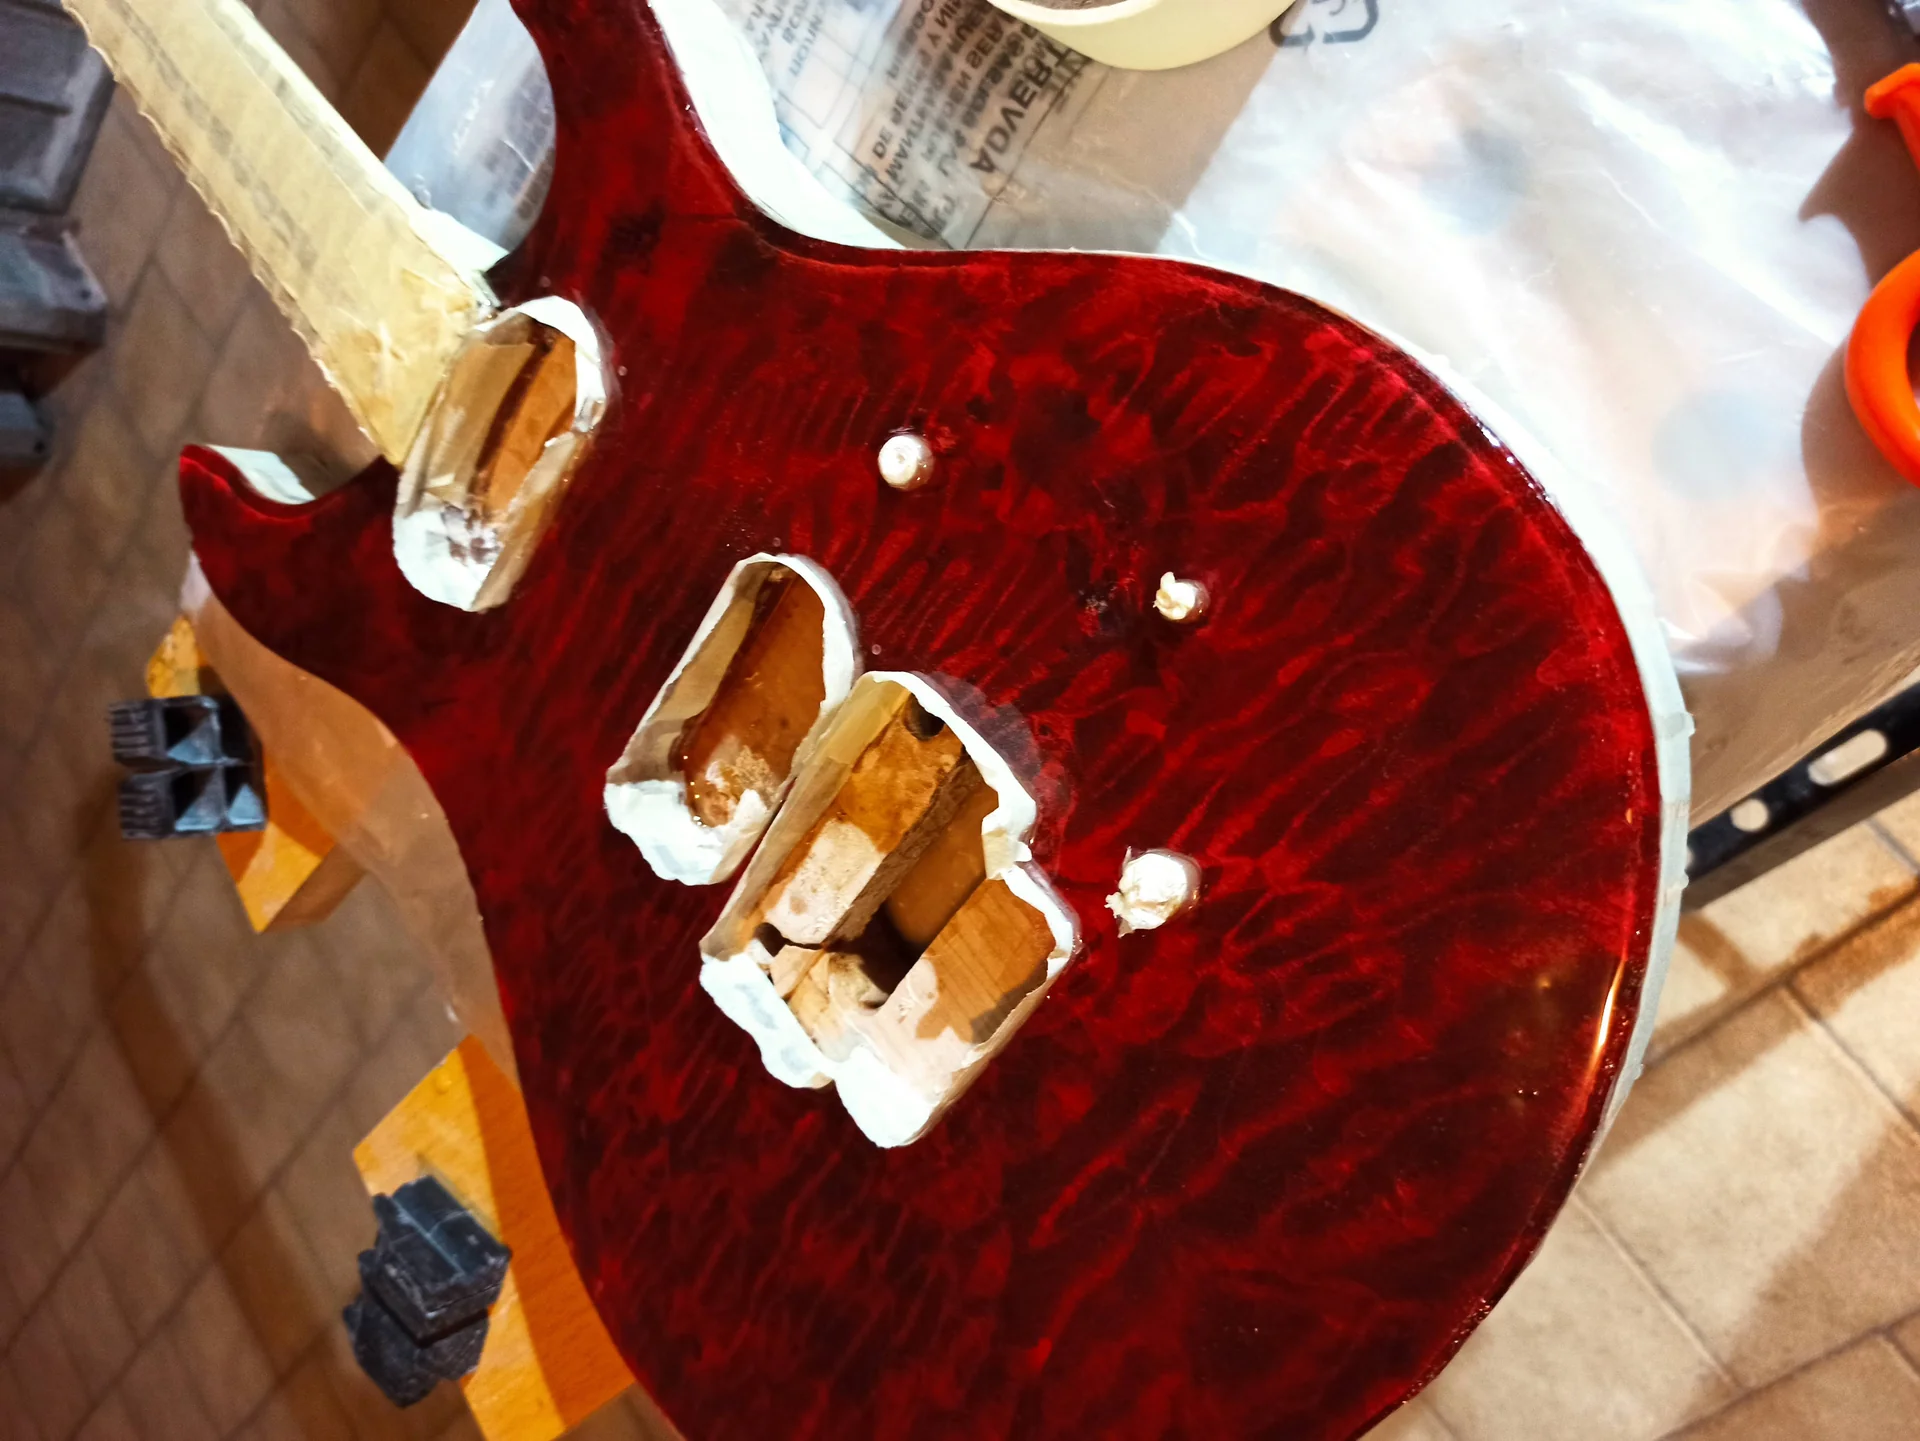
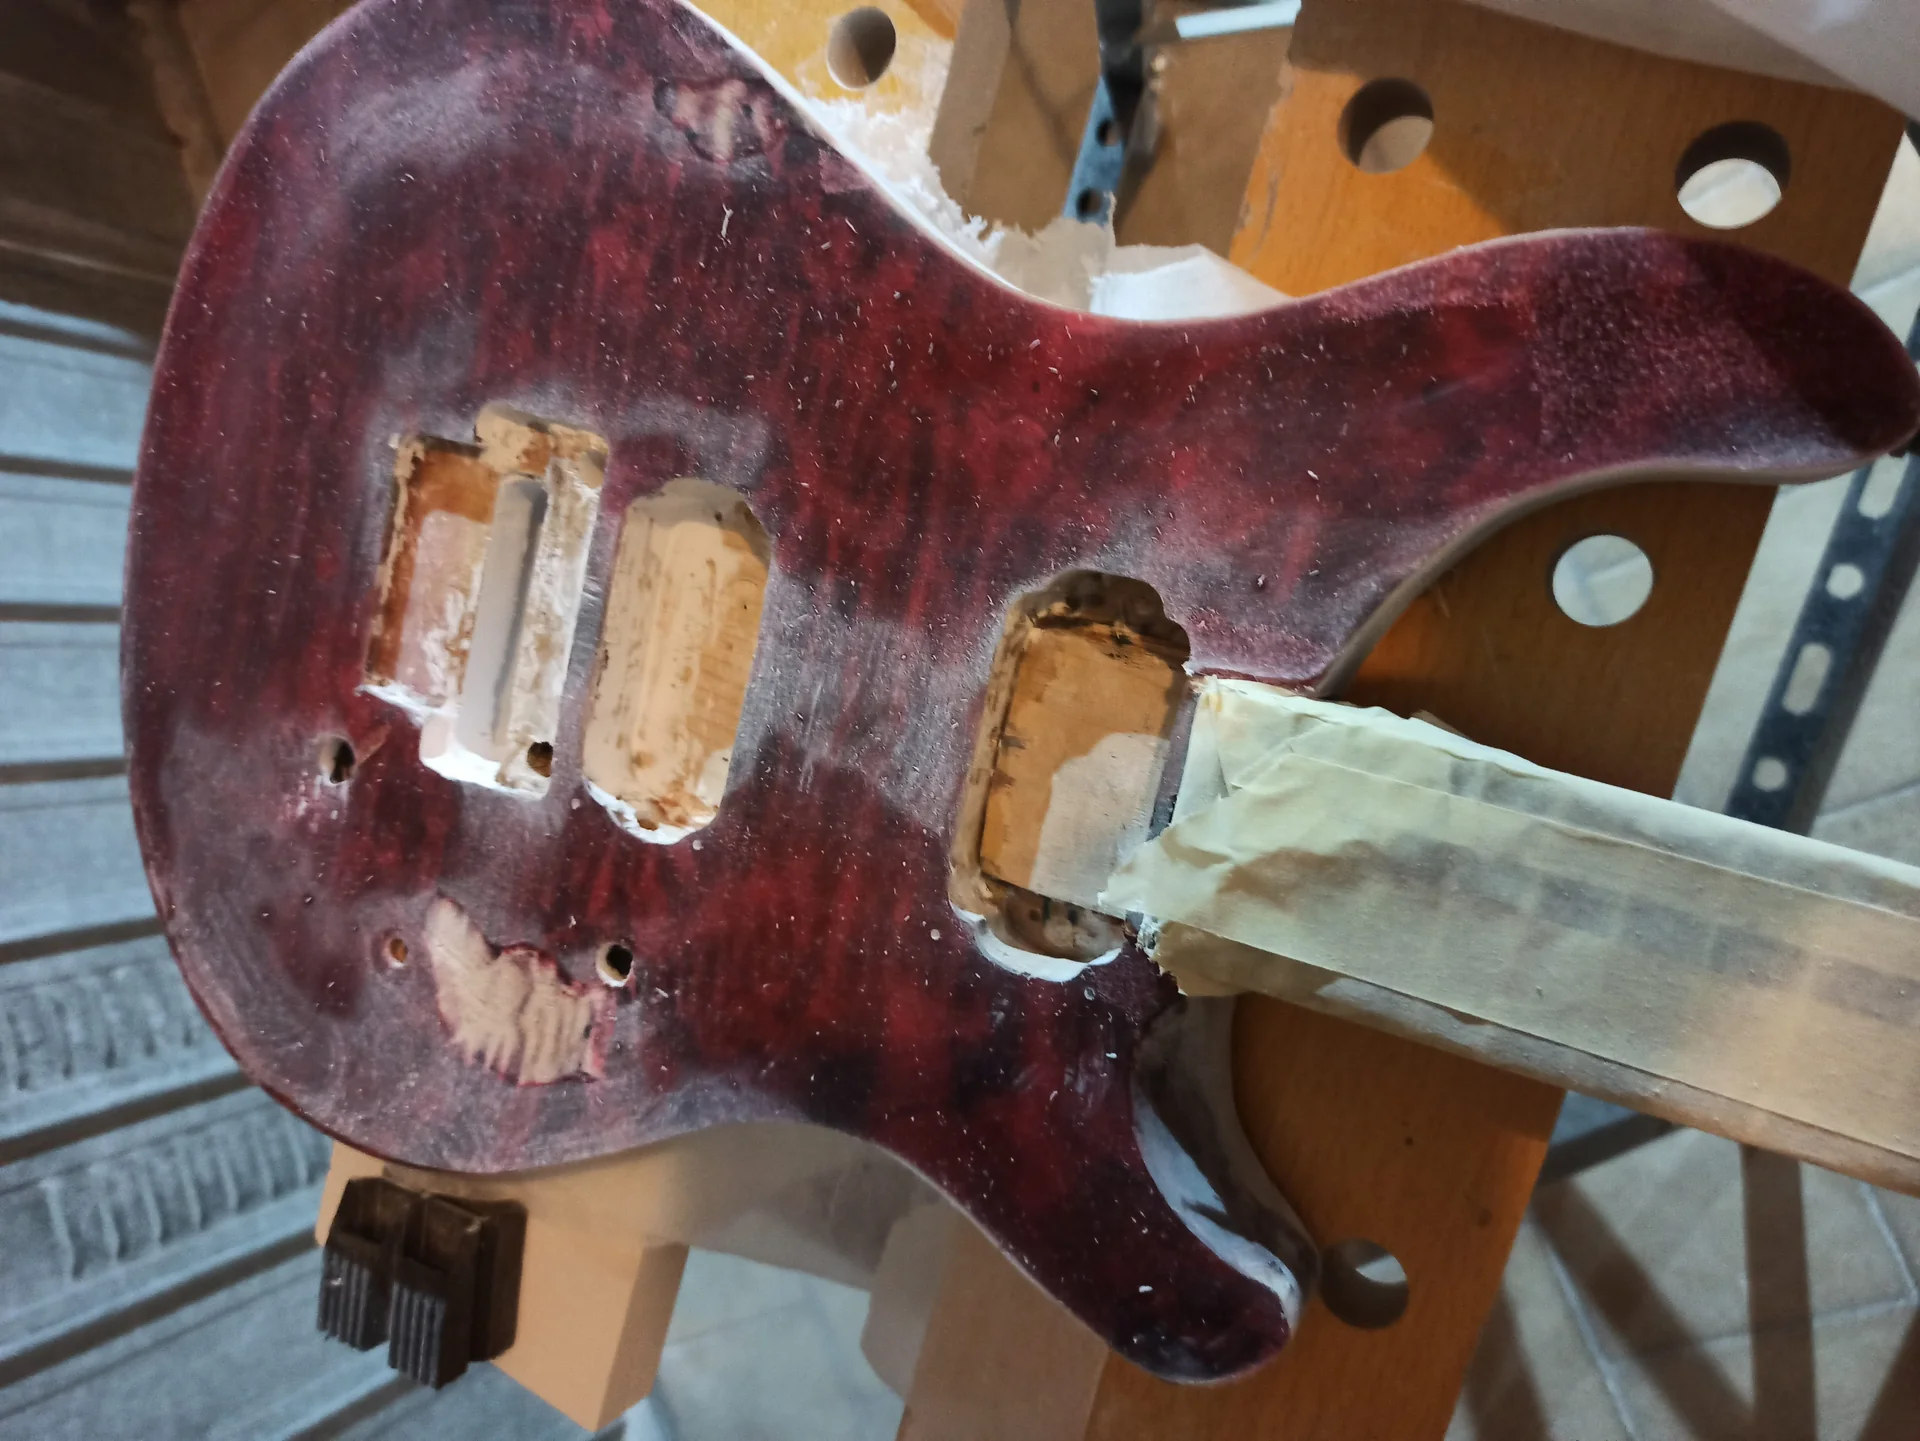
4. Hardware assembly: screw, don't destroy
Now that your finish is looking great (or at least decent, don't judge!), it's time to shape the instrument, guitar component assembly After the component. This step is pretty straightforward, but there are a couple of places where it can go awry. The most common? Screwing in without drilling the correct pilot holes.
Enemy number one: the reckless drill.
Almost every piece of hardware will need to be screwed into the wood: tuners, bridge, strap buttons, neck plate. Wood is delicate. If you screw a screw directly into the wood, you risk splitting the wood, stripping the screw, or not inserting it straight.
The solution: Pilot holes. Always.
How to Make Perfect Pilot Holes:n1. Measure the diameter of the screw: Excluding the thread, measure the diameter of the screw's "body." The pilot hole should be slightly smaller than this diameter, but larger than the screw's core. For example, if the screw has a diameter of 3 mm and the core is 2 mm, you would use a 2.5 mm drill bit. Depth: Use a piece of tape on the drill to mark the maximum depth of the screw. Never drill deeper than necessary. 3. Masking: To prevent the wood from splintering when the drill bit comes out, place some masking tape (such as gummed paper) on the area where you will make the hole.n4. Sharp tip: A sharp wood drill bit makes all the difference.
Let's move on to the components:
Mechanics (Tuners): They're usually mounted on the headstock. Some have a bushing that screws in from the front and a small screw that holds the tuning machine body in place at the back. Align them well, using a ruler to make sure they're all straight. Mark the screw locations, drill pilot holes, and screw them in.
Bridge: This is crucial for intonation and sustain. The position of the bridge is determined by the scale of the instrument. For a Stratocaster, the scale is 25.5 inches (64.77 cm). The center of the E string saddle (the thinnest string) should be exactly that distance from the nut. The other bridges should be adjusted accordingly. Mark the positions of the holes (there are often pins or long screws), drill the pilot holes very precisely, and screw them in.
Strap Buttons (Shoulder strap attachments): One on the upper horn of the body, the other on the bottom. It seems trivial, but if you don't drill the pilot holes correctly, you risk splitting the wood or making it loose. I once dropped a guitar because I screwed on the strap button without a pilot hole, and the screw stripped the wood. It didn't make a good sound.
Input Jack: The jack where you connect the cable. It's usually mounted on a metal plate or directly in the body. If it's in the body, the hole is usually already drilled.
Pickguard/Control Plate: If your kit has a pickguard, screw it on after installing the pickups and electronics. Again, drill pilot holes!
Handle plate: If you have a bolt-on neck, the metal plate on the back of the neck is screwed on with four long screws. Make sure the holes in the body align with those in the plate and neck.
Hobbyist's Pain Point: The fear of drilling in the wrong place, of splitting the wood, of having misaligned components.
My advice: Measure twice, drill once. Use an awl to mark the exact center of the hole. If you have a drill press, use it for the most critical holes (like deck pins). If you only have a hand drill, be very steady and straight. Masking tape can help prevent the drill from slipping at first.
Keyword variations: “install hardware”, “assemble guitar components”, “attach hardware to guitar”.
5. Wiring and electronics: the beating heart
Okay, you've got a nice piece of wood painted and with the hardware mounted. Now it's time to make it play. And here comes the... wiring a guitar kit And the electronics. For many, this is the most intimidating part. Soldering, following schematics, avoiding humming… it seems like a nightmare. But it isn't, if you know what to do.
The Holy Trinity: soldering iron, tin, schematic.
You'll need a good soldering iron (a 30-40W with a fine tip is perfect), good-quality solder (60/40 or lead-free for the more eco-conscious, but 60/40 is easier to use), and the wiring diagram for your kit. It's often included, but a quick Google search for "wiring diagram [guitar type] [pickup configuration]" will yield hundreds of results. Sites like Seymour Duncan or DiMarzio offer very detailed diagrams for every configuration.
The basic components: Pick-up: The “microphones” that capture the vibrations of the strings.
Potentiometers (Pots): They control the volume (volume pot) and tone (tone pot). They have a value in Ohms (e.g., 250kΩ for single coils, 500kΩ for humbuckers). This value affects the brightness of the sound.
Selector (Switch): It allows you to choose which pickup to activate.
Capacitors (Caps): Associated with the tone pots, they “cut” the high frequencies to darken the sound. They have a value in Farads (e.g., 0.022µF for humbuckers, 0.047µF for single coils).
* Output Jack: Where do you connect the amplifier?.
The basics of welding:n1. Clean tip: Always clean the tip of the soldering iron with a damp sponge before and after use.n2. Tin on the tip: Put a small amount of solder on the tip to improve heat transfer.n3. Heat the component, not the solder: Place the tip of the soldering iron on the component (e.g., the metal part of the potentiometer or the pickup terminal) for a couple of seconds. Then, bring the solder close to the heated component. The solder will melt and form a nice shiny mound. 4. “Cold” welds: If the solder is cloudy, lumpy, or poorly bonded, it's a cold solder. Redo it. Cold solder joints are the main cause of buzzing and signal interruptions.n5. Beware of heat: Don't hold the soldering iron on the components for too long, you could damage them, especially the potentiometers.
Step-by-step wiring (general idea):n1. Ground: This is the most important thing to avoid hum. All metal components must be grounded: the potentiometer housings, the bridge (via a wire running from the cavity to the bridge hole), the shield (if you have one), the pickup ground, and the jack ground. A "ground star" is often created where all the ground wires converge at a single point. 2. Pick-up: Each pickup has a "hot" wire that carries the signal and a ground wire. Connect the hot wire to the selector switch, the ground wire to the general ground.n3. Selector: The selector takes signals from the pickups and routes them to the volume pot.n4. Potentiometers: The signal from the selector goes to the volume, then from the volume to the tone. The tone capacitor goes between the center terminal of the tone potentiometer and ground.n5. Output jack: Connect the “hot” wire from the last potentiometer to the “hot” terminal of the jack, and the general ground to the ground terminal of the jack.
Shielding:
Not all kits include it, but it's an upgrade worth making. It consists of lining the cavities (pickups, electronics) with
