

Build Guitar Tremolo Bridge: The Basics
Yes, I know, the mere thought of build a guitar tremolo bridge from scratch can make your hair stand on end. It seems like one of those things that only luthiers with decades of experience and thousands of euros worth of equipment can do. I understand you perfectly, because the first time I tried to understand how a vibrato system worked, I thought I would end up doing more harm than good.
And yet, here I am. After a few botched attempts – yes, I drilled a body in the wrong spot, and I routed a cavity too large for the block – I realized it's not rocket science. It's precision mechanics, sure, but with patience, the right measurements, and a willingness to get your hands dirty, you can do it too. Maybe you won't create a boutique masterpiece on the first try, but you'll understand Really how your guitar works. And that's a priceless satisfaction.
This article is not about building a Floyd Rose, let's be clear. That's another story, with tolerances and complexities that require specific equipment. Here we talk about the foundations, about how a guitar tremolo bridge at its heart, referring to simpler systems, like Strat-style. The goal is to make you understand what's behind that piece of metal that allows you to do dive bombs and Gilmour-style vibratos. And, why not, give you the tools to build at least a part of it, or modify it, with full understanding.
If you've already installed some pickups, changed a neck, or done some setup, you're at the right level. We won't start from absolute basics, but we'll go straight to the details that a hobbyist often misses, those that make the difference between a vibrato that works and one that makes the guitar go out of tune every two seconds.
Tremolo Anatomy: What It Takes Under Your Fingers
[GRIGLIA FOTO]
When we talk about a guitar tremolo bridge, in reality, we're talking about a complex system. It's not just that piece of metal where the strings rest. It's a set of gears, pivots, springs, and levers that work in harmony (or disharmony, if you've assembled it incorrectly!).
The first time I disassembled a vibrato bridge, I thought “I'm not getting out of this alive”. Too many screws, too many springs, too many pieces that all looked the same. But then, calmly, I started to name everything and it all became clearer.
Here are the components main parts of a system guitar vibrato Stratocaster type, which is an excellent starting point for understanding the basics: Piastra Base (Base Plate): It is the main body of the bridge, that metal plate on which all the other pieces are mounted. It is the first thing you see on the body.
Sellette (Saddles): The small blocks on which the strings rest. They are adjustable in height and intonation. They are crucial for the feel and sound output.
Blocco Tremolo (Tremolo Block): A solid piece of metal that extends into the guitar body, under the base plate. It's where the strings are threaded and where the springs attach. Its mass and material greatly influence sustain and tone.
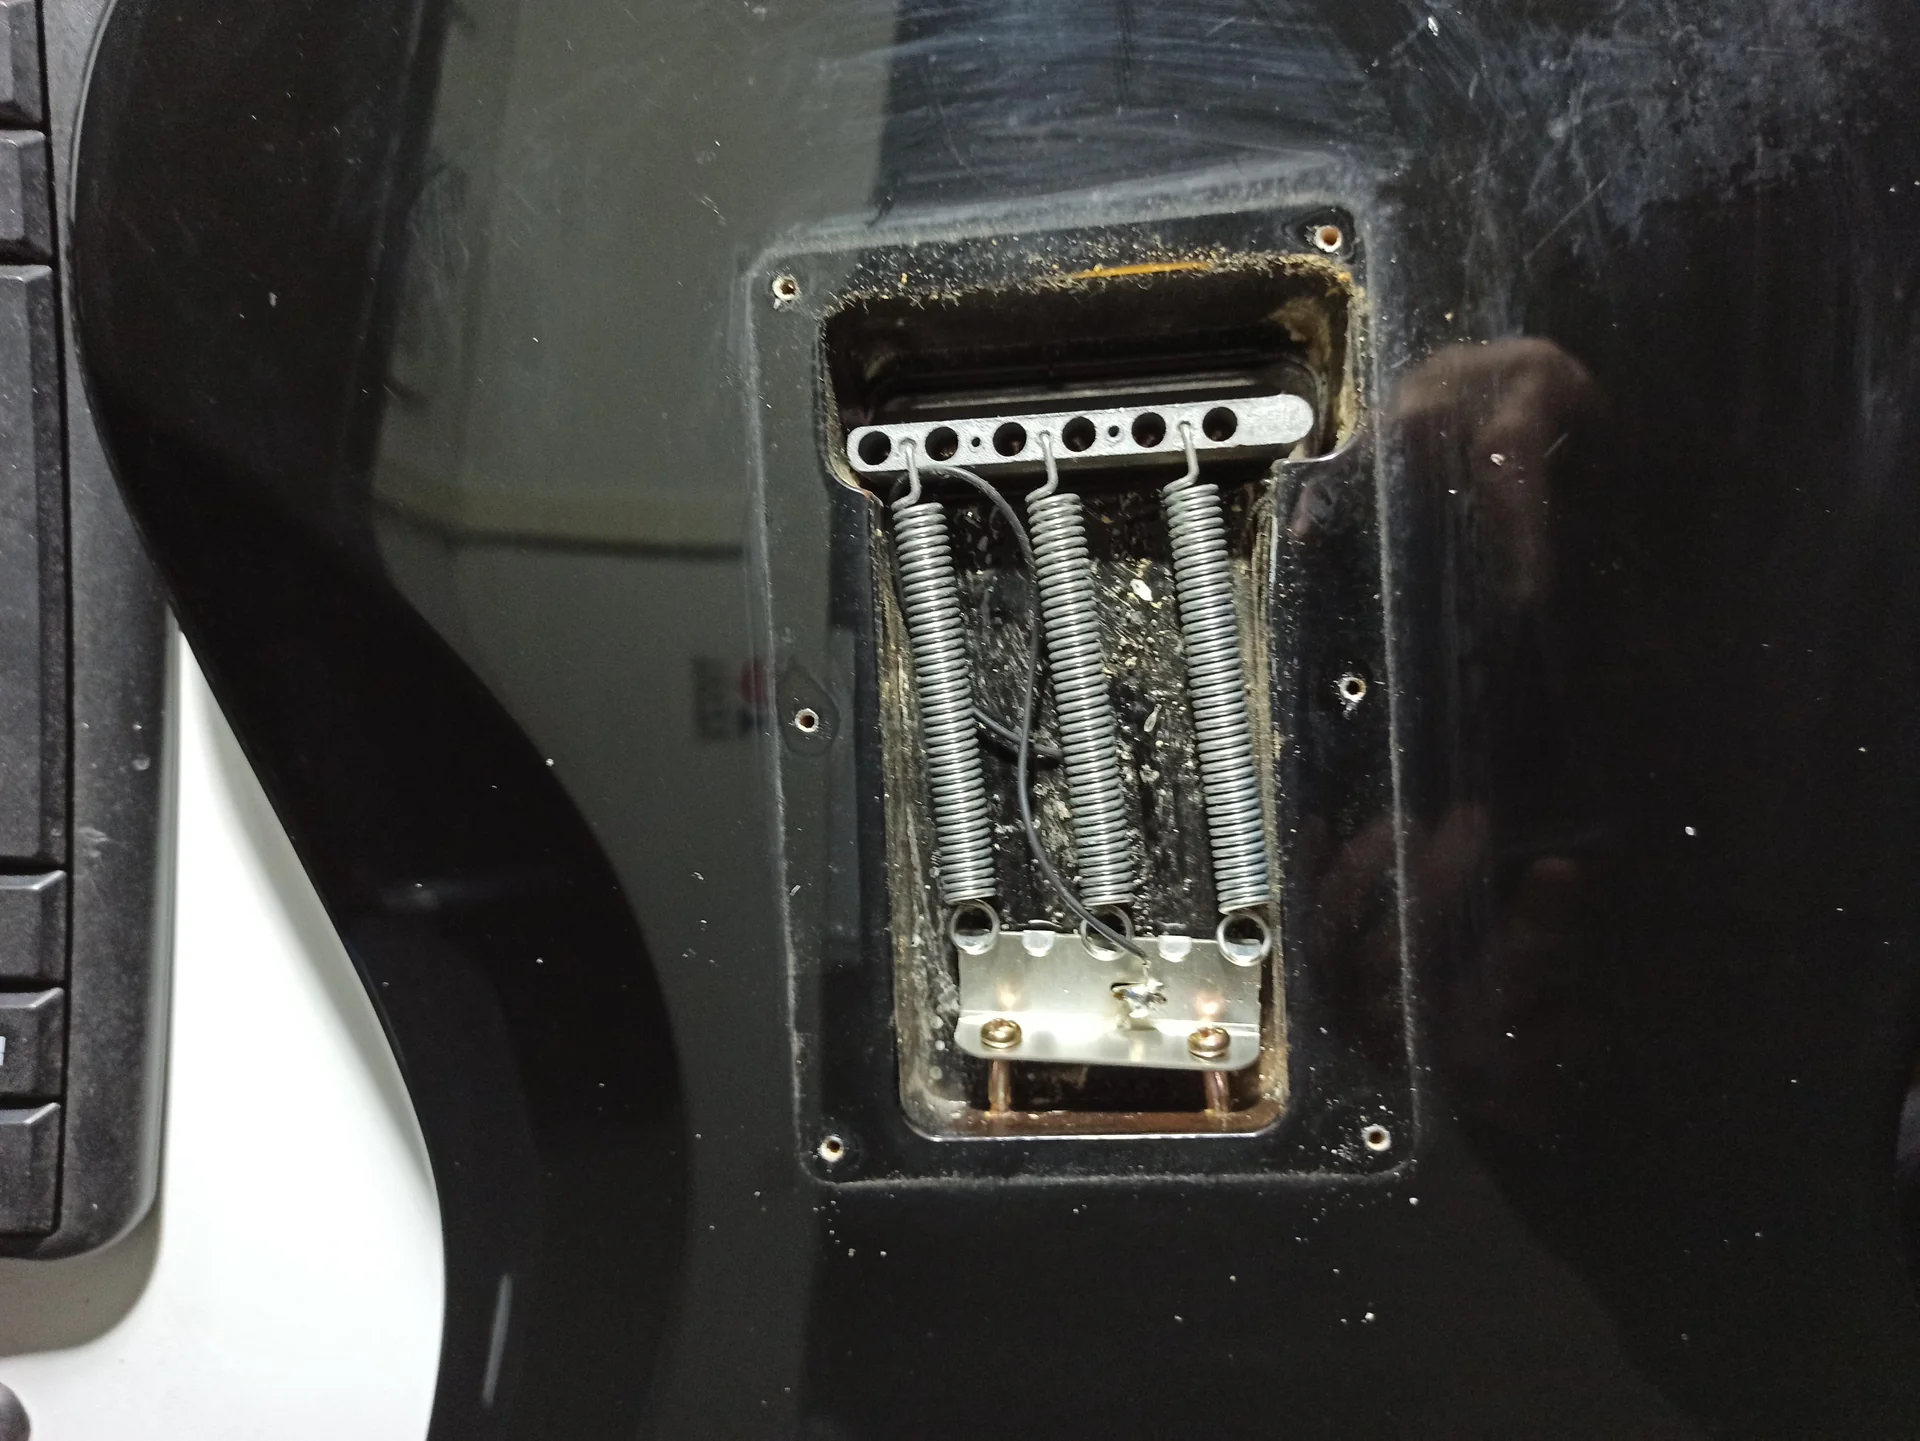
Molle (Springs): They are located in the back of the body, in the “spring cavity”. They pull the tremolo block in the opposite direction to the string tension, creating a balance.
Artiglio delle Molle (Spring Claw): A metal plate screwed to the wood in the spring cavity, to which the springs themselves attach.
Leva Tremolo (Tremolo Arm o Whammy Bar): The arm you use to move the bridge and create the vibrato effect. It screws into or inserts into the base plate or block.
Understanding the function of each part is the first step to not feeling lost. The base plate is the foundation, the saddles are the contact with the strings, the block is the heart that transmits vibrations, and the springs are the counterweight that allows movement. Each component has its role, and any modification or error on one of them affects the entire system.
The nice thing is that, once you understand this, you can apply the reasoning to almost all types of hardware tremolo, even to those that seem more complex. The basic principles remain the same: a pivot point, string tension, and a return force.
The Mechanical Heart: The Tremolo Block


Let's talk about the tremolo block, or “trem block”. This is one of those components that, when you don't know it, you underestimate. But believe me, it makes a hell of a difference. It's a piece of metal that attaches to the base plate and slides into the guitar body, and that's where the strings attach.
Why is it so important? For three main reasons: 1. Mass: A heavier block usually means more sustain. Mass helps maintain string vibrations longer. I tried a solid brass block on a Strat, it was a brick, but the sustain was truly remarkable!n2. Material: The material of the block affects the tone.
Steel: Bright, with good resonance and sustain. Very common and appreciated.
Brass: Warmer, with a more pronounced midrange. Great for a more “vintage” or full-bodied sound.
Zinc (Die-cast): Often used on cheap bridges. It's lighter and less resonant, tends to give a thinner sound and less sustain. I don't recommend it if you're looking for good tone.
When buying a cheap bridge, the block is often made of zinc. Replacing it with a steel or brass one is one of the first guitar modifications things I recommend to immediately improve sound and sustain. Dimensions and Precision: Don't Get the Holes Wrong!
If you decide to venture into building (or modifying) a block, dimensions are critical. In particular: Thickness and Width: They must fit the body cavity without touching the walls, otherwise the tremolo will not move freely. Measure your cavity carefully before doing anything!
Distance between string holes: It must match the string spacing of your bridge and neck. If the holes are too close or too wide, the strings will not align correctly on the saddles and pickups.
Depth of string holes: They must be deep enough to accommodate the string's “ball end” and lock it securely, but not so deep as to weaken the block.
Spring attachment holes: These too must be precise and well-aligned. Hobbyist Builder's Pain Point: The biggest hurdle here is the precision of the holes. If you don't have a drill press, making straight and parallel holes for the strings is hell. I tried doing them by hand with a portable drill the first time… let's just say the strings looked like a fan! I had to redo the block. My advice: If you don't have a lathe or a CNC mill, starting with a good quality raw block (steel or brass) and focusing only on the spring holes can be a smart compromise. Alternatively, buy a pre-made one with the dimensions you need and perhaps work on it to polish it or chamfer the edges. Tremolo Block Checklist: Material: Steel or Brass for good sound.
Dimensions: Compatible with the guitar cavity.
String Spacing: Must match your bridge and neck (e.g., 10.8mm or 11.3mm between strings).
String Holes: Straight, deep enough, well beveled so as not to cut the strings.
Spring Holes: Aligned and robust.
This piece, even if hidden, is fundamental. A good block can truly transform the feel and sound of your instrument. Don't skimp on its quality.
Enjoying this article? Subscribe to the newsletter: one email a week, zero spam.
Subscribe →The Base Plate: Foundations of your Vibrato
Ok, let's get to the main part, the one that in a sense defines your guitar tremolo bridge: the base plate. It's that metal plate you see on the surface of the body, on which the saddles, the block, and where the arm engages are mounted. This is the true “base” on which the entire vibrato system rests.
Building a base plate from scratch is ambitious, but feasible with the right tools and a lot, a lot of patience. The key is millimeter precision. A half-millimeter error here, and the strings will slip off the magnets or the edges of the fretboard.
Materials and Thickness: Don't Flex, Be Strong!
For the base plate, the most common materials are: Steel (Cold Rolled Steel, Stainless Steel): It is robust, resonant, and offers a good balance between brightness and sustain. Stainless steel is excellent because it does not corrode.
Brass: Softer than steel, it offers a warmer and rounder tone.
Nickel-plated: It is often a surface finish on steel or brass. Thickness is fundamental. A plate that is too thin flexes under string tension and will not give you tuning stability
and good vibration transfer. We are talking about thicknesses ranging from 1.5mm to 2.5mm, depending on the design and material. I have seen cheap plates flex like a sheet of paper, making the vibrato unusable. Don't make the same mistake! The Design and Crucial Measurements
The base plate is a tangle of holes and angles that must be perfect. Here's what you need to consider: 1. Mounting Points: Six Screws (Vintage-style): The plate is fixed to the body with six screws that act as pivots. The precision of the distance between the screws is vital.
Two Pivot Posts (Modern-style): The plate rests on two adjustable posts. Here, the distance between the two posts is the only thing that matters for mounting.
My advice: If it's your first time, the six screws can be more “forgiving” if you don't have absolute precision, because you have more contact points. But a well-made 2-point is more stable. 2. Saddle Holes: Each saddle has two screws that hold it on the plate. The distance between these holes must be standard (or match the saddles you will use) and, above all, they must be perfectly aligned and parallel to the front edge of the plate. 3. String Exit Holes: The strings exit from the back of the plate, then thread into the tremolo block. These holes must be aligned with the saddle holes and must not have sharp edges that could cut the strings. 4. Tremolo Arm Hole: The arm screws or inserts into a hole on the plate (or directly into the block, depending on the model). Here too, precision. Hobbyist Builder's Pain Point: The real nightmare here is marking and drilling. Getting all those exact measurements and drilling the holes perfectly straight and perpendicular to the surface is difficult. I've spent hours measuring and re-measuring, and I still sometimes make a small mistake. The frustration is real when you see a crooked hole!
Simplified Tools and Process
To work on the base plate, you will need: Material: A sheet of steel or brass of the correct thickness.
Digital Caliper: Essential for precise measurements.
Scribing Tool/Awl: To mark the centers of the holes.
Column Drill: Highly recommended. It ensures straight and precise holes. If you don't have one, you can use a hand drill with a jig, but it will be much more difficult.
Files and Sandpaper: To bevel the edges and finish.
Fret Saw or Grinder: To cut the plate from the raw sheet.
Template: This is your best friend! A good template in MDF or metal, with all the holes already precisely marked, saves you hours of work and swearing. I've learned that a good template prevents a lot of mistakes. You can find them online or have them milled. (Very) Simplified Process for Marking and Drilling: 1. Choose the Material: 2mm steel is a good starting point.n2. Cut the Raw Plate: Use the template to trace the external shape and cut it with a fretsaw or a grinder. Leave a small margin for finishing.n3. Finish the Edges: File and sand the outer edges until they are perfect and smooth.n4. Mark the Hole Centers: With the template or with precise measurements, mark the centers of all holes (mounting, saddles, string exit, lever) with an awl. Double-check the measurements three times!n5. Drilling: Start with a small drill bit (e.g., 2mm) to make pilot holes on all marked points. This ensures that the final hole is exactly where you want it.
Then, move on to the final diameter drill bits for each hole. For the saddle screw holes, make sure the diameter is correct for the thread of the screws you will use.
For the string exit holes, slightly chamfer the edges to avoid damaging the strings.n6. Finish: Chamfer all sharp edges, polish the plate if you want a mirror finish, or prepare it for plating.
Remember that patience is key here. Don't rush. Every measurement, every hole must be executed with the utmost care. An error here forces you to start over. And trust me, I've done it more times than I care to admit.
To delve deeper into the technical specifications and standard bridge measurements, an excellent resource can be the website of a hardware manufacturer like Wilkinson, Gotoh, or Fender itself, where detailed technical diagrams are often found. For example, you can find many useful specifications on the Callaham Guitars website, which produces high-quality vintage replicas and explains well the reasons behind certain design and material choices.
This precision work on the base plate is what will give you the foundation for a vibrato bridge stable and functional.
The Details that Make the Difference: Saddles and Springs
So far we have talked about the foundations, but the devil (or beauty) is in the details. Saddles and springs, despite being small, are components that make a huge difference to the feel, tone, and tuning stability of your tremolo system.
The Saddles: The Contact with the String
Saddles are those small blocks on which the string rests. They seem insignificant, but they are the direct point of contact between the vibrating string and the rest of the guitar (via the bridge). Material: As with the block, the material of the saddles is important.
Steel (Bent Steel or Solid Steel): Bent steel saddles (the classic vintage Strat style ones) are light and resonant, with a bright tone. Solid steel ones are heavier and offer more sustain and a more defined attack.
Brass: Warmer tone, with a softer attack and a more pronounced midrange.
Titanium: Very bright, light, with excellent sustain. Expensive, but for those seeking the maximum.
Shape and Design: The saddles have a groove where the string rests. This groove must be smooth and well-shaped to prevent the string from getting stuck or wearing out. Saddles with overly sharp edges can break strings.
Adjustments: Each saddle has two screws for height (which adjust the action) and one screw for intonation (which moves it back and forth). The quality of these screws and their smoothness are crucial for a good setup. My anecdote: Saddles are small, but they make a huge difference in feel. I remember replacing cheap zinc saddles on my Stratocaster with Callaham bent steel ones. Not only did the sustain increase, but the guitar sounded more “alive” and resonant. It felt like a different instrument! Don't underestimate this upgrade.
If you are building your base plate, you need to ensure that the screw holes for the saddles are perfectly aligned and that the distance between the saddles is as desired (the string spacing).
The Springs: The Secret of Balance
Springs are another often overlooked, but essential component for the operation of the tremolo bridge. They are located in the rear cavity of the body and pull the tremolo block, creating a balance with the string tension. Number: Most systems use 3 springs, but you can use 2, 4, or even 5. The more springs you use, the greater the return tension and the stiffer the system will be.
Tension: Springs are not all the same. Some are harder, others softer. This directly affects the “feel” of the tremolo arm.
Configuration: You can mount the springs in parallel (all straight), in a V (the outer ones angled), or in an X. Each configuration slightly alters the tension and response of the vibrato. My dilemma: I put it in, I took it out, I added two, I removed one… the balance of the springs is all here. I spent hours experimenting with different configurations and numbers of springs to find the setup I liked best. Some prefer a “floating” tremolo, which allows both lowering and raising the pitch. Others prefer it “decked”, which only allows lowering the pitch but offers greater stability. Common Error: Not understanding the importance of spring tension. If the springs are too weak, the bridge will rise too much and the guitar will easily go out of tune. If they are too strong, the tremolo arm will be very hard to use. Finding the right balance is a matter of trial and error. Mimmo’s Advice: Don't be afraid to experiment with springs. It's the only way to find the setup you like. Buy a set of springs of different hardness and try different configurations. It's a simple operation that doesn't require special tools, but it teaches you a lot about the behavior of your vibrato.
Another thing to consider is the “knife edge” or pivot posts. If your base plate has blades (like in Floyd Rose or 2-point tremolos) or rests on posts, these points must be perfect: sharp for fluid movement, but resistant to wear. If you are milling your plate, this is a crucial detail that requires extreme precision and a robust material.
In short, details are not “just details”. They are what transforms a piece of metal into a reactive and musical system. Pay attention to saddles and springs, and your experience with the vibrato bridge will improve exponentially. Assembly and First Tests: The Truth of Your Work
After struggling with measurements, cuts, and drilling, the moment of truth arrives: assembly and the first tests. This is where you understand if all your sweat has paid off or if you need to go back to the workbench. And trust me, it's rare for everything to go smoothly on the first try! Bridge Base Assembly
If you have built or modified the various components, here is a logical sequence to assemble your guitar tremolo bridge: 1. Mount the Tremolo Block on the Base Plate: Usually, the block is fixed to the plate with 3 screws. Make sure they are well tightened but not overtightened, to avoid stripping the thread in the block (especially if it's brass).n2. Attach the Saddles to the Base Plate: Screw the saddles to the plate, initially leaving them all at the same height and position (you will adjust them later).n3. Install the Bridge on the Body: Six screws: Position the bridge and screw the six mounting screws into the body. Do not tighten the screws completely at first, leave them slightly loose to allow the bridge to “settle”.
Two pivot posts: Screw the two pivot posts into the body. Make sure they are at the correct height and distance. The bridge will rest on these posts.n4. Mount the Spring Claw: In the rear cavity, screw the spring claw to the body. Start by positioning it about 1.5 cm from the edge of the cavity, but know that you will need to adjust it.n5. Hook the Springs: Connect the springs between the tremolo block and the claw. Start with 3 springs in parallel. Tightening and the First Chords
Now it's time to string the ropes. 1. Thread the Strings: Pass the strings through the tremolo block holes, over the saddles, and then to the tuners.n2. Tune the Guitar: As you tune, the bridge will begin to rise due to string tension.n3. Adjust the Spring Tension: If the bridge rises too much, you will need to tighten the spring claw screws to increase tension and pull it down. If the bridge is too low (or doesn't rise at all), loosen the screws.
Floating Tremolo: The goal is to have the base plate parallel to the body or slightly raised, so you can both lower and raise the pitch with the tremolo arm.
Decked Tremolo: In this case, the bridge is completely decked to the body. To achieve this, you will need to tighten the springs a lot. Pain Point: The first time I tried to use it, the guitar went completely out of tune after the first vibrato. Frustrating! The problem was the balance between string tension and spring tension. It takes patience to find the right spot. Testing and Troubleshooting: What Could Go Wrong
Don't expect a masterpiece on the first try. It's almost guaranteed that you'll encounter some problems. Here are the most common ones: Tuning Instability: The guitar goes out of tune immediately after using the tremolo arm.
Causes: Springs too weak, excessive friction at the saddles or nut, poor quality tuners, new strings that still need to settle.
Solutions: Adjust spring tension, lubricate the saddle and nut grooves with graphite or specific products, check that the strings are properly wound on the tuners.
Tremolo Too Stiff or Too Loose: The tremolo arm requires too much force or is too “loose”.
Causes: Spring tension not suitable for your taste.
Solutions: Add or remove springs, try springs of different stiffness, change the spring configuration.
Strings Breaking Often:
Causes: Sharp edges on the saddles, on the exit holes of the block or nut. Poor quality saddle material.
Solutions: Smooth all sharp edges with fine sandpaper. If the saddles are the problem, consider replacing them with a better quality set.
Noises or “Clack” during lever use:
Causes: Excessive play between the lever and its housing, loose saddle screws, springs rattling against the cavity walls.
Solutions: Try using a plastic insert or a rubber ring to reduce lever play, tighten the saddle screws, make sure the springs don't touch the walls.
Difficulty in intonation: The saddles do not have enough travel to correctly intonate all the strings.
Causes: Incorrect distance between the saddle holes on the base plate, or saddles with limited travel.
Solutions: If you are building the plate, you must have allowed enough space. If you are modifying, you might need to consider purchasing saddles with a longer travel or resorting to a bridge with a different design.
Managing these issues is an integral part of the process. Don't be discouraged if something doesn't work right away. Every problem is an opportunity to learn and improve your tool. Remember, every luthier has their toolbox full of solutions for these small mechanical dramas.
Build better. Subscribe for updates, guides and free ebooks.
Subscribe →Final Thoughts: Your Journey into the World of Tremolos
Build or modify a guitar tremolo bridge from scratch is a project that requires time, precision, and a good dose of patience. But the benefits are enormous. Not only do you learn in depth how one of the most iconic mechanisms of the electric guitar works, but you also gain incredible confidence in your abilities as a hobby luthier.
We have seen how each component – from the tremolo block to the base plate, from the saddles to the springs – has a significant impact on sound, feel, and tuning stability. Understanding these principles allows you to make informed choices when buying a new bridge, or when deciding to modify an existing one.
You don't necessarily have to build every single piece. Sometimes, starting with a good quality bridge and focusing on replacing the block, saddles, or optimizing the springs can lead to surprising results. The important thing is to understand the “why” behind every choice.
Remember, your guitar is an instrument, and as such, it can (and should!) be customized to suit your style and sound. Experiment, learn from your mistakes (because there will be some!) and, above all, have fun in the process. The satisfaction of playing a guitar you've worked on yourself, with a tremolo that responds exactly as you want, is priceless.
FAQ on Building a Tremolo Bridge
What are the best materials for a tremolo block?
For good sound and sustain, the best materials for a tremolo block are steel and brass. Steel offers brightness and resonance, while brass gives a warmer, fuller tone. Avoid die-cast zinc blocks if you're looking for sound quality.
How important is measurement precision in building a tremolo bridge?
Precision is absolutely fundamental. Even a half-millimeter error in the position of the saddle holes or the base plate can compromise intonation, action, and tuning stability, rendering the bridge unusable.
For further technical details you can consult this external resource.
See also
Download the Luthier Survival Kit
Free PDF with checklist, problem-cause table and project card template.
 English
  Italiano
Stuck on your build?
If you ran into the same problem or have a question, drop it in the comments. I read and reply to every one.
Write a comment