Building an Electric Guitar Body: 5 Mistakes to Avoid
Building a guitar electric Starting from scratch is a journey. A journey that takes you from the smell of raw wood to the first chord you play with your own hands. The satisfaction is immense, I won't deny it. But the road isn't always straight. In fact, it's often full of sharp turns and a few skids.
I speak from experience. The first time I tried to make the building the body of an electric guitar, I felt a bit like a kid given the keys to a tractor. Excitement was sky-high, but I had little idea how to harness that power. I made mistakes, some big ones. Mistakes that taught me more than a thousand tutorials.
And I want to talk to you about these very mistakes today. Not to scare you, but to give you some direction. If I've been there, and come away with a playable (and even decent!) guitar, you can do it too. The important thing is to know where the most common pitfalls lie.
Because, let's face it, the body is the heart of your guitar. It's not just a shaped piece of wood. It's the foundation for everything: the sound, the balance, the ergonomics. Getting it wrong here means compromising the project from the start. But don't worry, with a little attention and the right advice, you'll avoid a lot of headaches.
So, buckle up and let's get ready to explore the 5 most common mistakes in body construction of an electric guitar. And, trust me, they're not the only ones I've done, but they're the ones that made me sweat the most.
1. Underestimating the choice of wood and its preparation
.biafax-photo-grid { display: grid !important; gap: 12px; margin: 24px 0; }
.biafax-photo-grid-3v { grid-template-columns: repeat(3, 1fr) !important; }
.biafax-photo-grid-2h { grid-template-columns: repeat(2, 1fr) !important; }
.biafax-photo-grid a { display: block; overflow: hidden; border-radius: 6px; line-height: 0; }
.biafax-photo-grid img { width: 100%; height: 100%; object-fit: cover; aspect ratio: 4 / 3; transition: transform 0.3s ease; }
.biafax-photo-grid a:hover img { transform: scale(1.03); }
.biafax-photo-grid br { display: none; }
.biafax-photo-grid-caption { text-align: center; font-style: italic; color: #555; margin: -12px 0 24px; }
.biafax-lightbox-overlay { position: fixed; inset: 0; background: rgba(0,0,0,0.92); display: flex; align-items: center; justify-content: center; z-index: 99999; cursor: zoom-out; }
.biafax-lightbox-overlay img { max-width: 92vw; max-height: 92vh; object-fit: contain; border-radius: 4px; }
@media (max-width: 768px) {
.biafax-photo-grid-3v { grid-template-columns: 1fr !important; }
.biafax-photo-grid-2h { grid-template-columns: 1fr !important; }
}
(function() {
if (window.biafaxGridLightbox) return;
window.biafaxGridLightbox = true;
document.addEventListener(‘click’, function(e) {
var a = e.target.closest(‘a[data-lightbox]’);
if (!a) return;
e.preventDefault();
var overlay = document.createElement(‘div’);
overlay.className = 'biafax-lightbox-overlay';
overlay.innerHTML = '‘‘';
document.body.appendChild(overlay);
overlay.addEventListener(‘click’, function() { overlay.remove(); });
document.addEventListener(‘keydown’, function handler(ev) {
if (ev.key === 'Escape') { overlay.remove(); document.removeEventListener('keydown', handler); }
});
});
})();
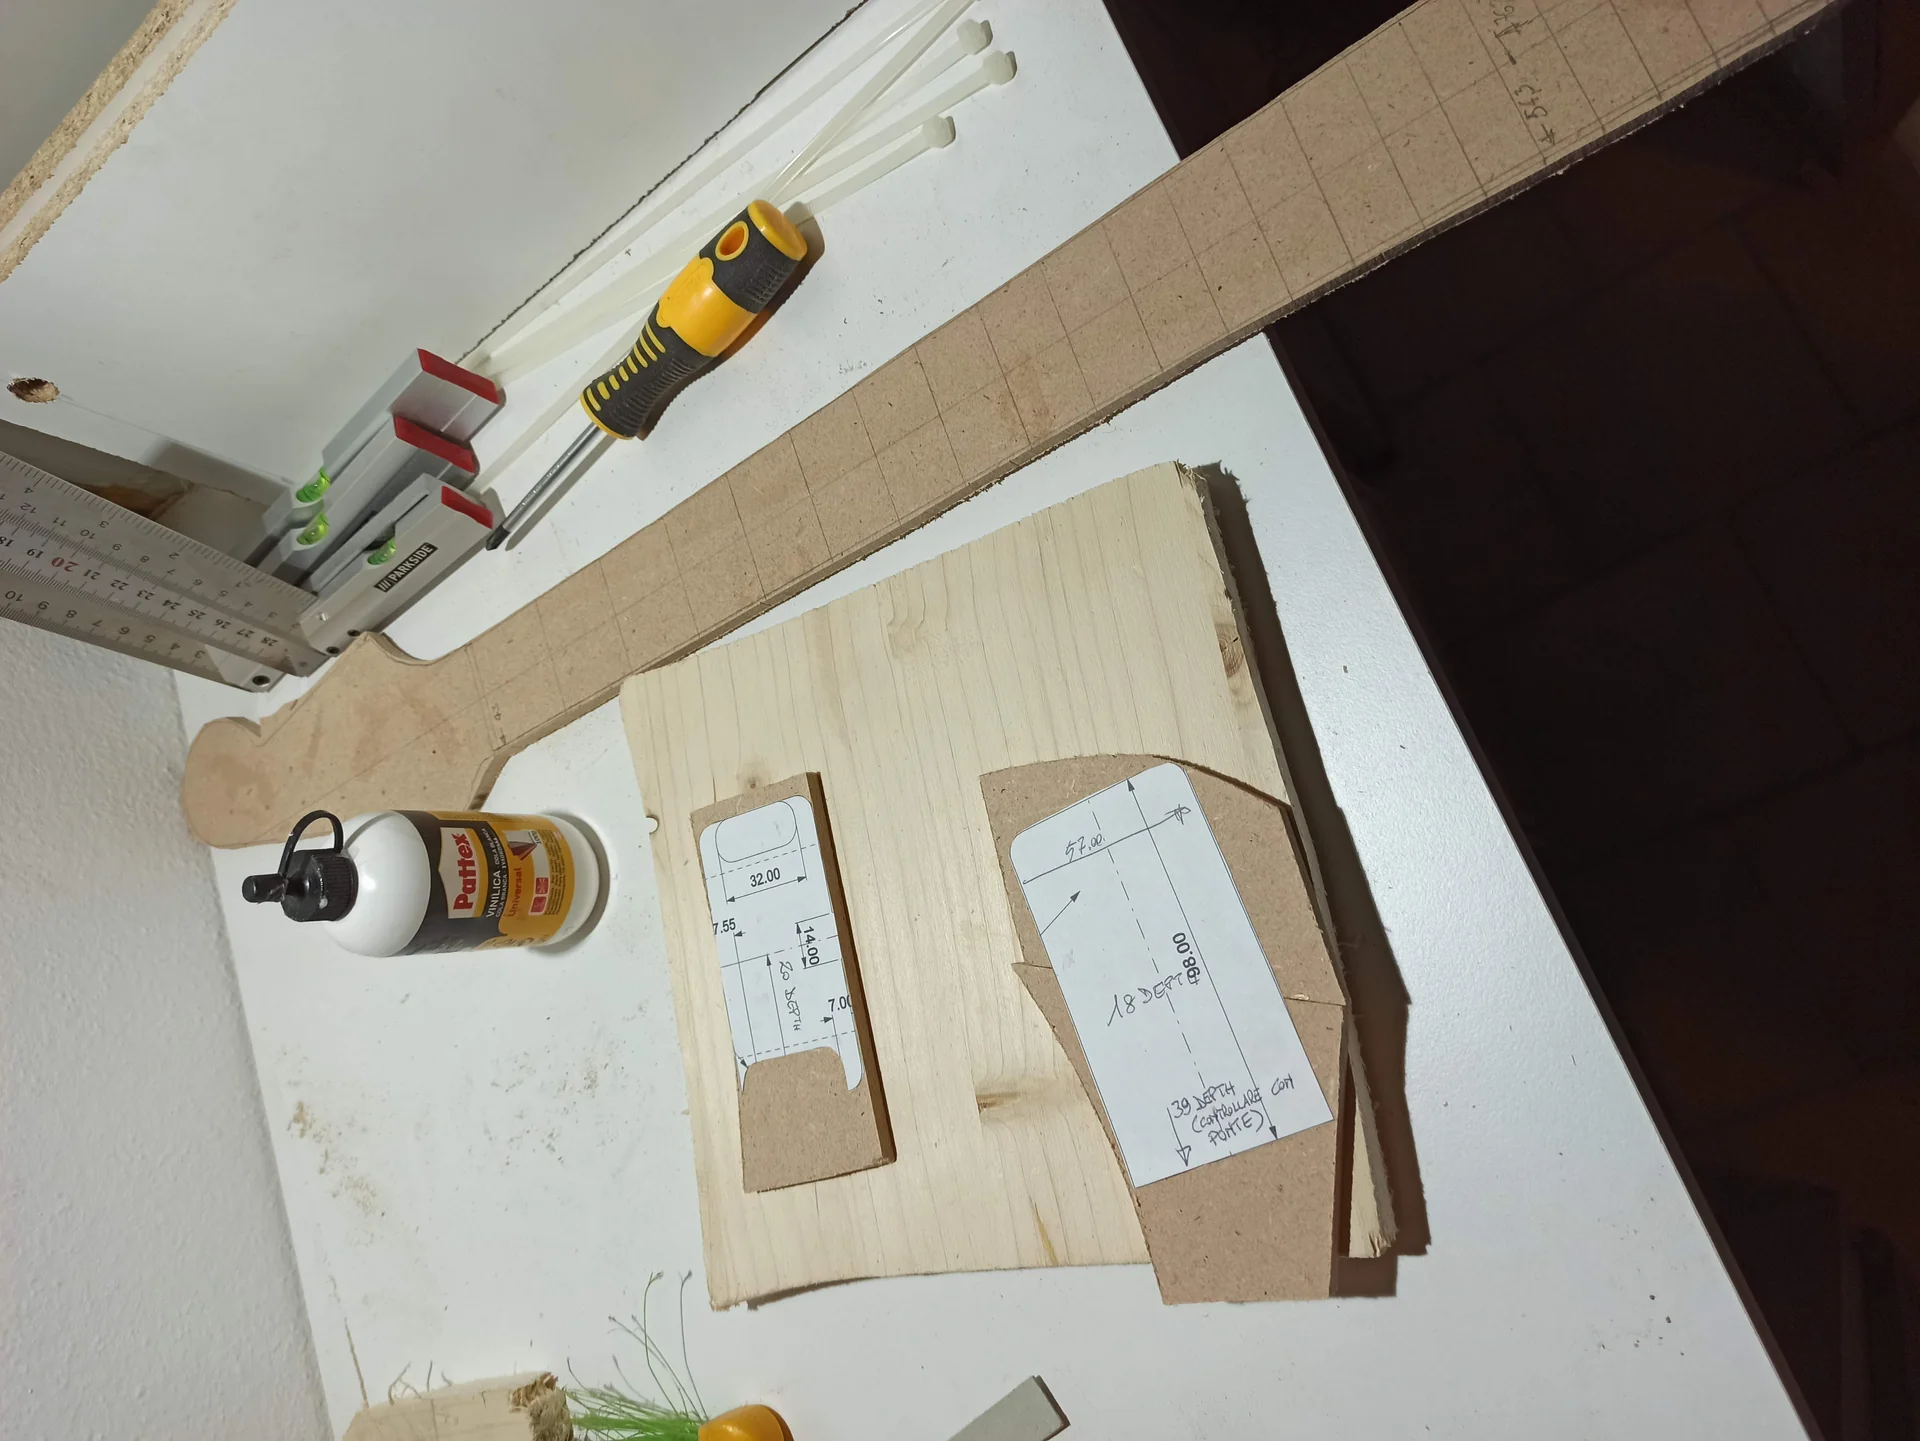
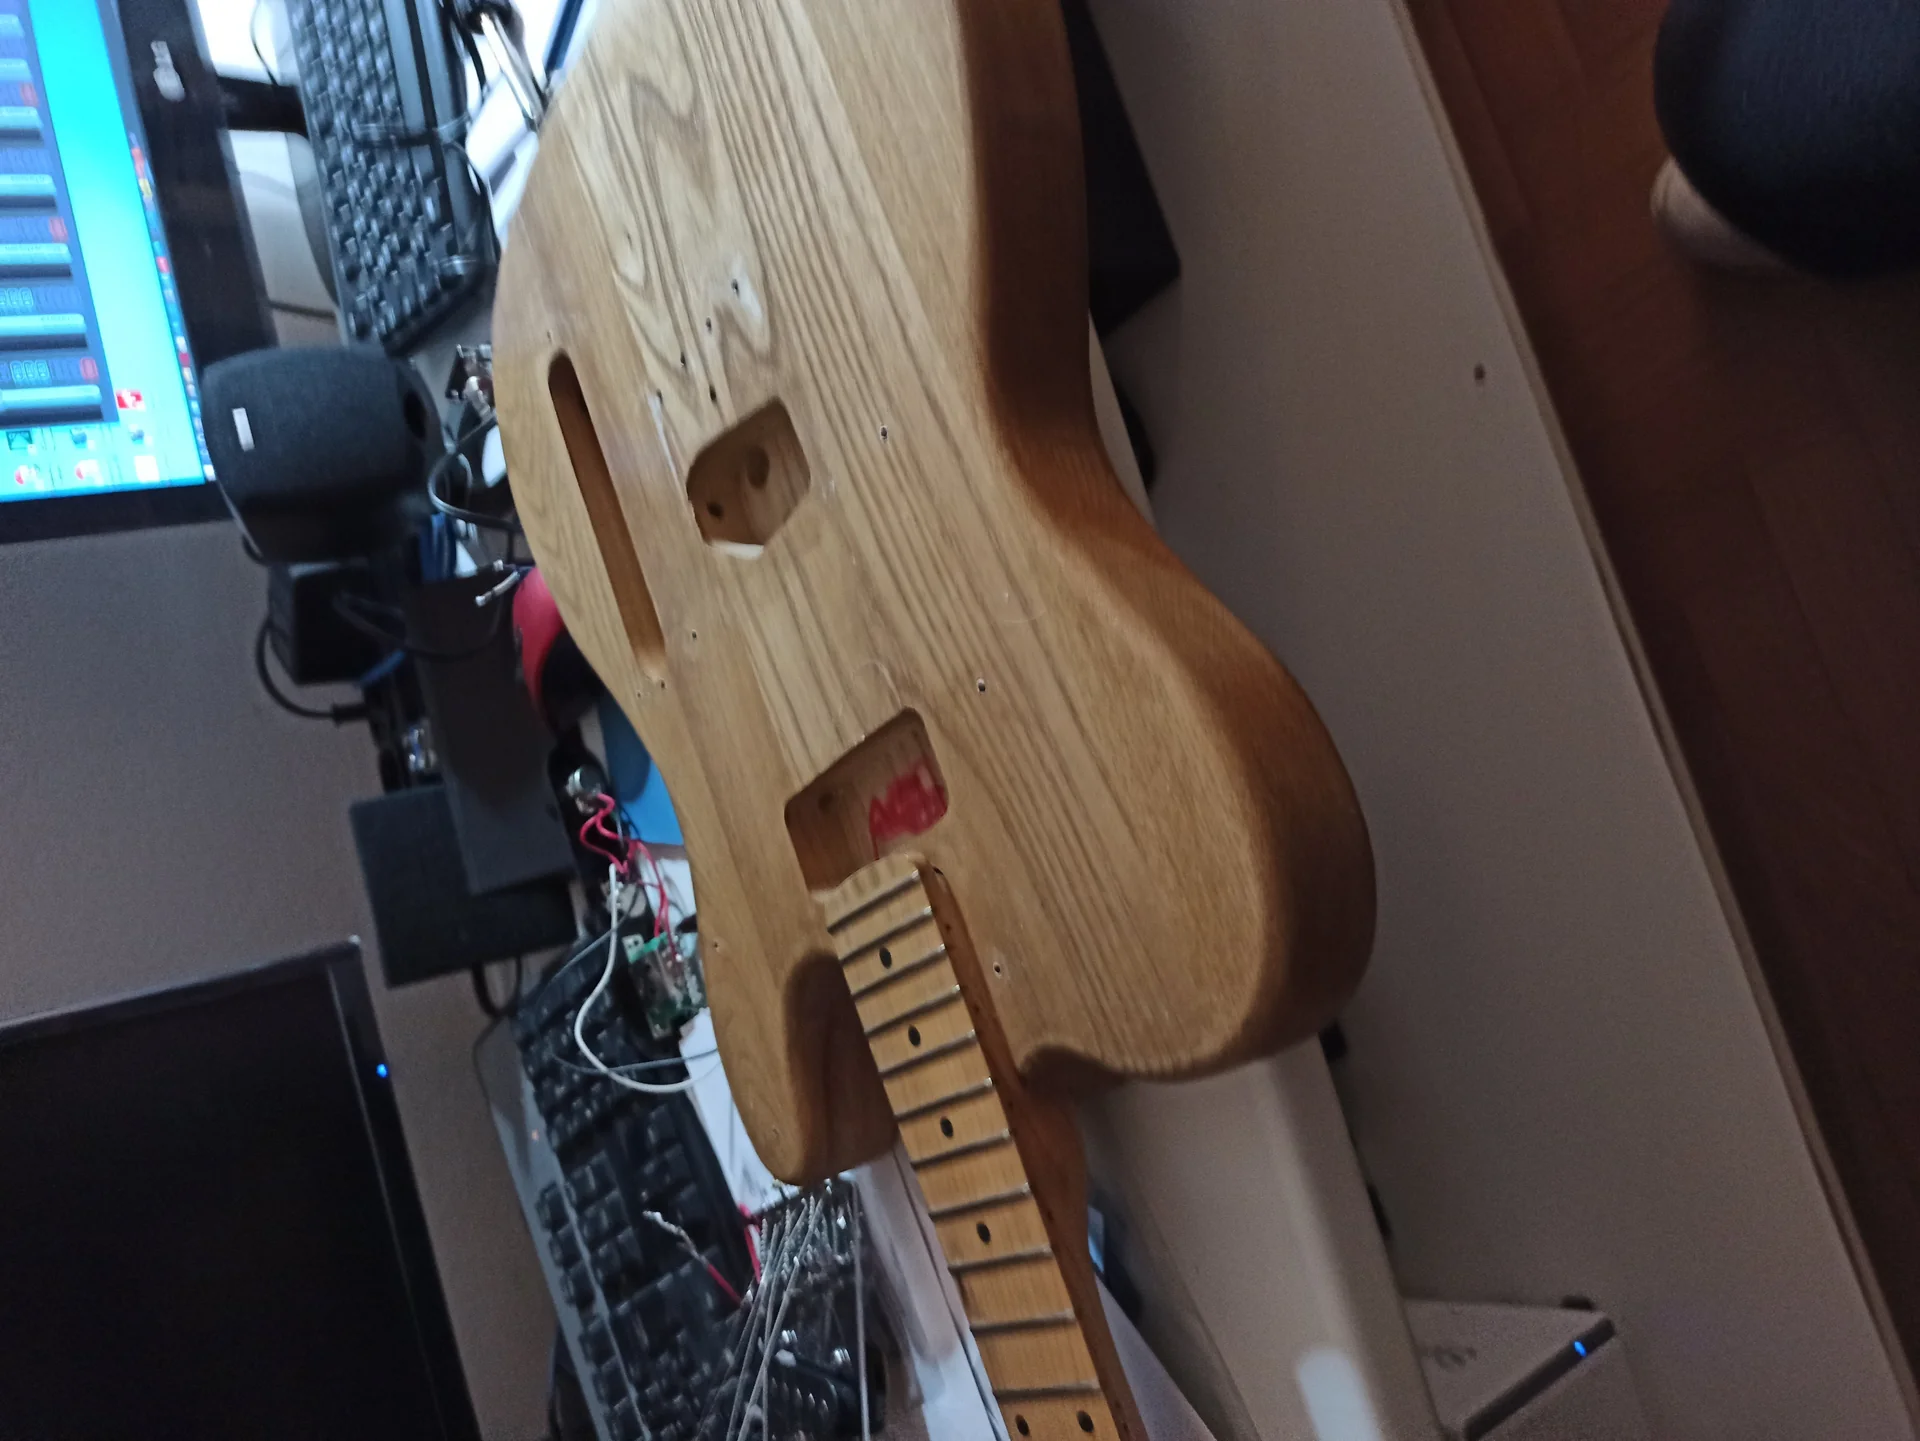
In this gallery: preparation, body, template and wood.
.biafax-photo-grid { display: grid !important; gap: 12px; margin: 24px 0; }
.biafax-photo-grid-3v { grid-template-columns: repeat(3, 1fr) !important; }
.biafax-photo-grid-2h { grid-template-columns: repeat(2, 1fr) !important; }
.biafax-photo-grid a { display: block; overflow: hidden; border-radius: 6px; line-height: 0; }
.biafax-photo-grid img { width: 100%; height: 100%; object-fit: cover; aspect ratio: 4 / 3; transition: transform 0.3s ease; }
.biafax-photo-grid a:hover img { transform: scale(1.03); }
.biafax-photo-grid br { display: none; }
.biafax-photo-grid-caption { text-align: center; font-style: italic; color: #555; margin: -12px 0 24px; }
.biafax-lightbox-overlay { position: fixed; inset: 0; background: rgba(0,0,0,0.92); display: flex; align-items: center; justify-content: center; z-index: 99999; cursor: zoom-out; }
.biafax-lightbox-overlay img { max-width: 92vw; max-height: 92vh; object-fit: contain; border-radius: 4px; }
@media (max-width: 768px) {
.biafax-photo-grid-3v { grid-template-columns: 1fr !important; }
.biafax-photo-grid-2h { grid-template-columns: 1fr !important; }
}
(function() {
if (window.biafaxGridLightbox) return;
window.biafaxGridLightbox = true;
document.addEventListener(‘click’, function(e) {
var a = e.target.closest(‘a[data-lightbox]’);
if (!a) return;
e.preventDefault();
var overlay = document.createElement(‘div’);
overlay.className = 'biafax-lightbox-overlay';
overlay.innerHTML = '‘‘';
document.body.appendChild(overlay);
overlay.addEventListener(‘click’, function() { overlay.remove(); });
document.addEventListener(‘keydown’, function handler(ev) {
if (ev.key === 'Escape') { overlay.remove(); document.removeEventListener('keydown', handler); }
});
});
})();
In this gallery: preparation, body, template and wood.
This is one of the most classic mistakes, and also one of the most insidious, because its effects are only seen much later. When you venture into building the body of an electric guitar, The first thing that comes to mind is the shape, the cavities, the handle. Right. But what about the raw material? It's often relegated to "any piece of wood." Big mistake.
The first time, I found a nice piece of solid beech from a carpenter friend. It was beautiful, solid, and seemed perfect. I planed it, cut it, and milled it. Everything was smooth as silk. I assembled it all. After a couple of months, the guitar had developed a hump on the top that looked like a hill. The intonation was off, the action was sky-high. Panic.
The problem? The wood wasn't seasoned properly.
Why is wood selection and preparation crucial?
Wood is not an inert material. It's alive, breathing, absorbing and releasing moisture. This process causes it to move, swell, or shrink. If the wood hasn't been properly dried and stabilized, your guitar will do the same.
Imagine building a house on a shifting foundation. It's the same thing. The dimensional stability of the wood is crucial to the guitar's long-term stability.
Then there's the sound. Each wood has its own tonal characteristics. Alder is balanced and resonant, excellent for Strats and Teles. Swamp ash is light, with bright highs and powerful lows. Mahogany is warm, with pronounced mids and remarkable sustain. Basswood is light and neutral, easy to work with.
There is no absolute “best” wood, but there is a wood that is best suited to the sound you are looking for and the type of guitar you want to build.
How to avoid the mistake: practical advice
1. Buy from trusted suppliers: Don't skimp on wood. Go to a woodshop that specializes in musical instrument wood or reputable online suppliers. They know how to season wood. Some well-known names are LMI (Luthier's Mercantile International) or StewMac, but there are also excellent European suppliers. Do your research and read reviews. Check the moisture content: If you have access, use a wood hygrometer. For wood intended for instruments, the humidity should be between 6% and 8%. If it's higher, the wood still needs to "rest."3. Acclimatization: Even if the wood is already seasoned, once it arrives at your home, let it rest for a few weeks in your work environment. This allows it to adapt to the humidity and temperature of your garage or workshop. Avoid storing it in places that are too humid or too dry. Glue the pieces together well: If your body is made up of multiple pieces (like most guitars), the glue must be flawless. Use a specific wood glue (Titebond is a classic), apply it evenly, and clamp the pieces together with suitable clamps. Make sure the surfaces are perfectly planed and flush. No gaps or bubbles. Planing and thickness: Once glued, plane the block on both sides to achieve the desired thickness (usually between 40 and 45 mm for electrics). Check the thickness in several places with a caliper. A flat and even base is essential for all subsequent work.
Remember, wood is the starting point. Investing time and resources here will save you a lot of frustration later. And it will give you a guitar that will sound great and last a long time.
2. Inaccurate drawings and templates: the basis of everything
Okay, the wood is ready. Beautiful, seasoned, planed. Now it's time to shape it! And this is where many, including me, have their first real problem. How do you transfer the desired shape to the wood? And how do you ensure it's precise?
The very first time, I found a picture of a Stratocaster online, printed it out, cut it out with scissors, and glued it to the wood. Then I tried to follow the outline with a band saw. The result? A Stratocaster that looked more like an abstract work of art than a guitar. The curves were irregular, the edges jagged. A disaster.
This is because I underestimated the importance of having some template (masks) precise.
Why are templates your Bible?
Imagine you want to build a piece of furniture. You don't go by eye, right? You have a plan, precise measurements. For the body shaping It's the same with a guitar, but with even greater precision.
Templates aren't just for the outer outline. They're useful for:
The external shape of the body.
The neck pocket.
The pickup cavities.
The electronics cavity (control cavity).
The tremolo cavity (if present).
The holes for the jack, the potentiometers, the switches.
Every single part must be perfect. A slightly crooked neck pocket means a crooked neck. An off-center pickup cavity means a pickup that doesn't line up with the strings. And what about intonation? A poorly positioned bridge ruins it.
The precision of the templates guarantees that all the mechanical and electronic components will align perfectly. And that your guitar will be playable and in tune.
How to avoid the mistake: practical advice
1. Don't draw freehand: Unless you're an artist with a bionic eye and a very steady hand, avoid drawing directly on the wood. It's too easy to make mistakes. 2. Use quality templates: Buy them: Many suppliers (StewMac, Philadelphia Luthier Tools) sell ready-made MDF or acrylic templates for the most common models (Strat, Tele, Les Paul, etc.). This is the easiest and safest way to get started. They have precise measurements, tested and retested.
Make them do it: If you have an original design, you can have it laser-cut or CNC-milled by an external service. This guarantees incredible precision.
Do it yourself (with caution): If you want to make them yourself, use thick MDF (at least 6-10 mm) or plexiglass. Print the drawing at 1:1 scale, glue it to the template material, cut precisely (with a jigsaw or band saw with a thin blade), and then sand the edges until they are perfectly smooth and straight/curved. Any imperfections on the template will be transferred to the body.n3. Check the measurements: Before you start cutting the wood, check all the measurements on the template with a caliper, especially the distances between the neck pocket, pickup cavities, and bridge. If you're using a pre-finished neck, make sure the neck pocket template is compatible with its dimensions. 4. Fixing the template: When using the template for tracing or routing, make sure it's securely attached to the wood. Clamps, strong double-sided tape, or screws (in areas that will later be removed or covered) are essential. It shouldn't move even a millimeter.
A well-made template is an investment of time or money that will pay off in accuracy and less frustration. Don't skip this crucial step in manufacturing of the sound box.
3. Rushed and uncontrolled routing
After choosing the wood and preparing the templates, it's time to shape your body. And here comes one of the most versatile (and fearsome) tools of the hobby luthier: the router.
The first time I used the router to cut the pickup cavities, I was thrilled. I fixed the template, inserted the bit, and off we go! Full speed, maximum depth, and down we go. The result? A "hole" that looked like it had been made by an angry beaver, with jagged, jagged edges and an uneven depth. And that piece of wood, well, was no longer usable for that project.
The mistake? Too much haste and too little knowledge of the instrument.
Why is routing so tricky?
The router is a powerful machine, spinning at thousands of revolutions per minute. If used incorrectly, it can quickly ruin the wood, or worse, cause injury. Tear-outs are common, especially with open-grained or cross-grained wood.
The milling must be clean, precise, and of the right depth. This applies to the pickup cavities, electronics, bridge, and neck slot. Any imperfections will be visible, and in some cases (like the neck pocket) will compromise the functionality of the guitar.
How to avoid the mistake: practical tips for body milling
1. Sharp and correct cutter: Always use cutters specifically designed for wood and make sure they are sharp. A dull cutter will overheat the wood, burning it, and tearing it. To follow templates, use bearing bits of the correct size. 2. Superficial steps: This is the golden tip. Don't try to go all the way through at once. Make several passes, each no deeper than 5-8 mm. This reduces stress on the wood and the bit, prevents chipping, and gives you more control. 3. Cutting direction: Conventional Cut (conventional cut): The cutter rotates so that the cutting edge pushes the wood in the direction of feed. This is more controllable, but can cause more splinters upon exit.
Climb Cut (climb cut): The cutter rotates so that the cutting edge pulls the wood. It's more aggressive, less controllable if you're inexperienced, but it reduces chipping.
The standard practice is to make an initial superficial pass (a couple of mm) using a climb cut, to define the edges without chipping. Then proceed with subsequent passes using a conventional cut. For the external contours, always proceed clockwise. For internal cavities, proceed counterclockwise. n4. Securely fix the template and the workpiece: I repeat: nothing moves! Use sturdy clamps, even four or more, to hold the template and the piece of wood firmly on the bench. Any vibration or slippage is disastrous. Practice on scraps: Before tackling the final body, do some tests on pieces of scrap wood, perhaps the same type you'll use for the guitar. This will help you become familiar with the machine and understand how the wood reacts.n6. Chip extraction: The router produces a huge amount of chips and dust. Always connect a vacuum cleaner. Not only for your health, but also because it allows you to see what you're doing and keeps your work area clean.n7. Safety: Wear safety glasses, wear hearing protection, and never, ever get distracted while your router is running. It's a powerful tool and should be treated with respect.
Tackling the woodworking for guitar Using a milling machine requires patience and method. Don't rush. Each milling operation must be carefully planned and executed.
4. The neck pocket: the nerve center of stability
If there is a part in the building the body of an electric guitar That can make you sweat a lot, that's the neck pocket. This isn't a joke. A poorly made neck pocket means a guitar that will never sound good, period.
The first time I tackled this challenge, I thought, "It's just a rectangle, what's the big deal?" I milled it out, tried to fit the neck. It wobbled. It wobbled so much I could have used it as a rattle. I tried adding cardboard shims. A disaster. The stability was zero, the sustain nonexistent, and the intonation? A mystery.
I had to redo everything. Take a new piece of wood and start over. A hard lesson, but a necessary one.
Why is the neck pocket so critical?
The neck pocket is the connection point between the neck and the body. This is where the vibration of the strings is transferred from the neck to the body and vice versa. A solid and precise connection is essential for:
Sustain: A perfect fit allows the vibration to propagate freely, increasing the guitar's sustain. If there's any play, the vibration is dispersed.
Intonation: A neck that is not square to the body or that is not aligned with the bridge will make it impossible to intonate the guitar correctly across the entire fretboard.
Action stability: If the neck moves, the string height (action) will also be unstable and difficult to adjust.
Structural strength: The neck pocket must withstand the tension of the strings. A weak or imprecise fit may fail over time.
Basically, if the neck pocket is wrong, you have a beautiful piece of art to hang on the wall, not a playable guitar.
How to avoid the mistake: practical tips for handle housing
1. Precise measurements of the handle: Before milling the pocket, you need to know the exact measurements of the neck you'll be using. This includes the heel width, heel height, and the length of the part that fits into the body. If it's a pre-finished neck, measure it with a digital caliper. Don't rely on standard measurements; each neck can have small variations. 2. Specific template for the neck pocket: Use a dedicated template for the neck pocket, perhaps one purchased or custom-made for your neck. This template should be made of thick MDF or acrylic and perfectly straight. 3. Gradual milling: Again, don't rush. Mill the pocket in shallow passes (3-5 mm at a time). The final depth depends on the neck and the type of bridge you'll be using, but for most Strat/Tele-style guitars, it's around 16-17 mm. Check the depth with a caliper after each pass. 4. Snug fit: The handle should fit into the pocket with light pressure, but without forcing. It should feel like a glove. If it fits too easily, there's play. If you have to hammer it in, it's too tight. Ideally, you should push it in with your hands and feel it snap into place. 5. Alignment Check: Once the neck is inserted (still without screws), place a metal straightedge along the low E side of the neck and another along the high E side. These straightedges should point straight at the holes or mounting points of the bridge. This will tell you if the neck is perfectly straight relative to the body.n6. Neck pocket angle (if necessary): For guitars with a fixed bridge (e.g., a Tune-o-matic) or some types of tremolos, a slight angle in the neck pocket may be necessary to achieve the correct string height. This is done by milling the bottom of the pocket at a slight angle (usually 0.5-1 degree). This is a more advanced operation; if you're just starting out, you might opt for a flat-mount bridge or an angled neck heel. Cleaning the edges: After routing, the inside edges of the pocket may not be perfectly 90 degrees or may have small imperfections. Finish them with sharp chisels and sandpaper wrapped around a block of wood.
A perfect neck pocket is the hallmark of a job well done. Take all the time you need for this stage of the process. building the body of an electric guitar. It's an investment that pays off in playability and satisfaction.
5. Finishing: Don't underestimate the importance of preparation
You've chosen the right wood, the templates were precise, the milling clean, and the neck pocket a glove. The body is there, rough, but already promising. Now comes the finishing phase. And here, the mistake I made (and that I often see made) is just one: rushing the preparation.
The first time, after shaping my body, I gave it a quick sandpaper run, said, "Okay, that's fine," and sprayed it. Oh, the disappointment! Every little scratch I'd overlooked, every plane mark, every tiny imperfection that seemed invisible to the naked eye, popped out beneath the glossy coat of paint as if it had been highlighted by a headlight. It looked like a road map, not a guitar.
The finish doesn't hide flaws. It amplifies them.
Why is preparation more important than the finish itself?
The finish (varnish, oil, wax) is the final layer you apply to your guitar. It's its skin, its calling card. But it's also a microscope. Every scratch, every dip, every unfilled wood pore, every unremoved workmanship mark will become evident once the light reflects off the polished or satin surface.
A perfect finish does not only depend on the skill in applying the paint, but on the meticulous work done Before. It's like painting a picture: if the canvas is crooked and dirty, even the most beautiful masterpiece will look amateurish.
How to avoid the mistake: practical tips for body finishing
1. Progressive and meticulous sanding: This is the secret. Don't go straight from 80 grit to 400. You need to work your way up gradually, using increasingly finer grit sandpaper.
Start with a coarse grit (80-100) to remove the most obvious plane or saw marks.
Switch to 120-150 to refine.
Then at 180-220 to eliminate the signs of the previous grain.
Continue with 320, 400, and if you want a really smooth finish, even 600.
Between each grain, clean off any dust thoroughly and, above all, shine a low light (a table lamp, a flashlight) on the body to highlight any scratches. I assure you, you'll see a lot of them!
Trick: Between each grain, you can give a light wipe with a damp cloth. This will lift the wood grain, making any raised hairs easier to sand. 2. Sanding blocks: Never sand freehand. Always use sanding blocks to keep surfaces flat and distribute pressure evenly. For curves, you can use shaped blocks or wrap paper around a piece of pipe. 3. Fill pores (grain filling): If you're using open-pore woods like mahogany or ash, you need to fill the pores before finishing. Otherwise, the paint will sink into the pores and you'll end up with an orange peel surface. There are specific products (grain fillers) that are applied, allowed to dry, and then sanded. This creates a smooth, even surface. Impeccable cleanliness: Before giving any kind of finishing, the body must be perfectly Clean from dust, grease, and fingerprints. Use compressed air, tack cloths (adhesive cloths for collecting dust), or specific solvents. 5. Primer/base coat: If you're using colored or nitro-based paints, a good primer or undercoat is essential. It helps even out the surface, seal the wood, and provide a foundation for the final finish to adhere better. The primer should also be sanded with fine grits.n6. Patience with the finish: Whether you choose an oil, wax, or varnish finish (polyurethane, nitrocellulose), carefully follow the manufacturer's instructions regarding application, drying times, and intermediate sanding. Rushing is the enemy of a finish.
The finish is the icing on the cake of your building the body of an electric guitar. Don't ruin it out of impatience. Take your time, be meticulous, and the end result will be worth every effort. Remember that even the best finish can't mask a poorly made body. If you want to delve deeper into how the finish can affect not only the aesthetics but also the sound, you might want to take a look at how a thick finish can dampen vibrations and how a thinner or oil finish can preserve the natural resonance of the wood, an important aspect that is often also considered when deciding on a modify a guitar existing.
Conclusion: Learn from mistakes, don't get discouraged
Here, these are the five mistakes that made me suffer the most during my experience in building the body of an electric guitar. And, as I was telling you, they weren't the only ones. There was the pot hole that was milled too big, the jack hole that was crooked, the tremolo cavity that was out of alignment. Each time, a sigh, sometimes a curse, and then it started all over again.
The important thing is not to get discouraged. DIY is this. It's learning by making mistakes. It's the satisfaction of having overcome an obstacle, of having found a solution, of having understood. Why something wasn't working and how to make it work.
You don't need a workshop costing thousands of euros or professional tools to get started. I started in my garage, with a second-hand drill press and a router I bought on sale. What you really need is patience, a desire to learn, and determination.
Every mistake is a lesson. And every lesson brings you one step closer to your perfect guitar. So, grab your tools, choose your wood, and don't be afraid to get your hands dirty. If I could do it, you can too.
And if you have any doubts, questions, or a mistake you'd like to share (because, trust me, you're not the only one!), leave a comment. That's what the community is here for. And remember, the road to violin making is long, but every step is another melody.
For a deeper dive into wood selection, a great resource is Warmoth's blog, which details the tonal properties of various woods used for guitar bodies and necks: [https://www.warmoth.com/guitar-body-wood-options](https://www.warmoth.com/guitar-body-wood-options). It's a great read to better understand how each wood affects the final sound of your instrument.
See also
- Assembling an electric guitar kit: 3 mistakes to avoid.
- Electric Guitar Neck: 7 Mistakes to Avoid
- DIY Hollow Body Guitar Kit: 5 Mistakes to Avoid