


Installation Wilkinson Tremolo Guitar DIY
So, let's be clear: installing a fixed bridge is a breeze. Two screws, maybe a bushing for through-body strings, and you're done. But when it comes to a Wilkinson tremolo or any floating bridge, things get a bit complicated. It's not a trivial operation, especially if it's your first time. I still remember my first guitar with a tremolo of that type, a Stratocaster clone that I absolutely wanted to upgrade. I made a crooked hole for a pivot, a classic! And there you understand that good will isn't enough, you need a method and a bit of cleverness.The point is not just screwing, it's understanding Why every step is important. Because a Wilkinson, with its two pivots, is different from a vintage six-screw vibrato. And above all, how not to ruin the body of your newly built or modified guitar. The biggest fear, I've heard it from many of you on forums and in chats, is precisely that of drilling in the wrong place, chipping the wood, or not aligning properly. Don't worry, I've been through it too. And I assure you that, with a little attention, you can do it too.
This article is not an engineer's manual, but my experience as someone who has done and redone, who has learned from mistakes and who now wants to give you some tips to avoid my own pitfalls. We will focus on the Wilkinson tremolo because it's an excellent compromise between stability, functionality, and a still accessible cost for DIY enthusiasts. Models like the VS100 or the Gotoh 510T (which is often a licensed Wilkinson) are fantastic, but require precision.
What you need to mount your Wilkinson Tremolo
This is the moment when many feel anxiety rising. The critical point, I'll tell you right away, is alignment. A crooked bridge is not only ugly to look at, but it compromises playability and tuning.
The Starting Point: The Measurements of your Wilkinson Tremolo
Advertising

Musiclily Pro Treble Bleed Mod with Sprague Orange Drop 225P Capacitor and Precision Resistor for Electric Guitar Bass .001uF+150K | Film/Sheet Polyester 225P for Electric Guitar Bass .001uF + 150K
See on Amazon

Measure the string spacing: The distance between the center of the first and last string. This will help you align the strings with the neck.
Create or Use a Template: Your best friend
The template is essential. It allows you to mark drilling points with precision and, if you need to rout the cavity, it guides you with the router. 1. Find the technical drawings: Search “Wilkinson VS100 routing template” or “Gotoh 510T dimensions” online. You usually find technical drawings in PDF.n2. Print in 1:1 scale: Always check with a ruler that the print is exactly to scale.n3. Make the template: Glue the drawing onto a piece of MDF or plywood at least 6mm thick. Use spray glue or a strong adhesive. Precisely cut out the holes for the pivots and the opening for the tremolo block (if you need to do the routing). I use a hole saw for the pivot holes and then a band saw for the rest, but even a Dremel with the right bit can do the job. Precision is important. My experience: The first time I tried to do everything freehand, with a ruler and a pencil. Result? The pivot holes were not perfectly parallel to the neck. The bridge would slightly jam when I used the tremolo arm. I had to slightly widen the holes, not ideal. Since then, only with a template. I advise you not to repeat my mistake.Positioning the Template on the Body: The Moment of Truth
This is the most delicate step. You must ensure that the bridge is aligned not only with the body, but especially with the neck. 1. Find the center line of the body: Use a ruler to mark a perfectly central line on the body, from the neck pocket to the bottom edge. This will be your main reference.n2. Measure the distance from the neck: The bridge must be positioned so that, when the guitar is intonated, the distance between the nut and the 12th fret is equal to the distance between the 12th fret and the point of contact of the strings on the saddles. This is the basis of intonation (guitar scale). For a Wilkinson, the reference point is usually the center of the pivots, or the front edge of the bridge. Consult the manufacturer's specifications for the exact bridge position relative to the nominal scale.A practical trick: Many amateur luthiers position the bridge so that the center of the pivots is about 31-32mm behind the theoretical scale line (which is usually the distance between the nut and 25.5″ for a Strat). This gives enough “play” for saddle intonation. But check your specifications.n3. Align with the neck: Insert the neck into its pocket (even just resting it) and use two thin strings (high E and low E) as a reference. Stretch them from the nut to the point where they should rest on the bridge saddles. This will help you understand if the bridge is centered with respect to the neck.n4. Secure the template: Once you are sure of the alignment and position, secure the template to the body with paper masking tape. Be generous, it must not move a millimeter.
The Cavity Routing (if necessary)
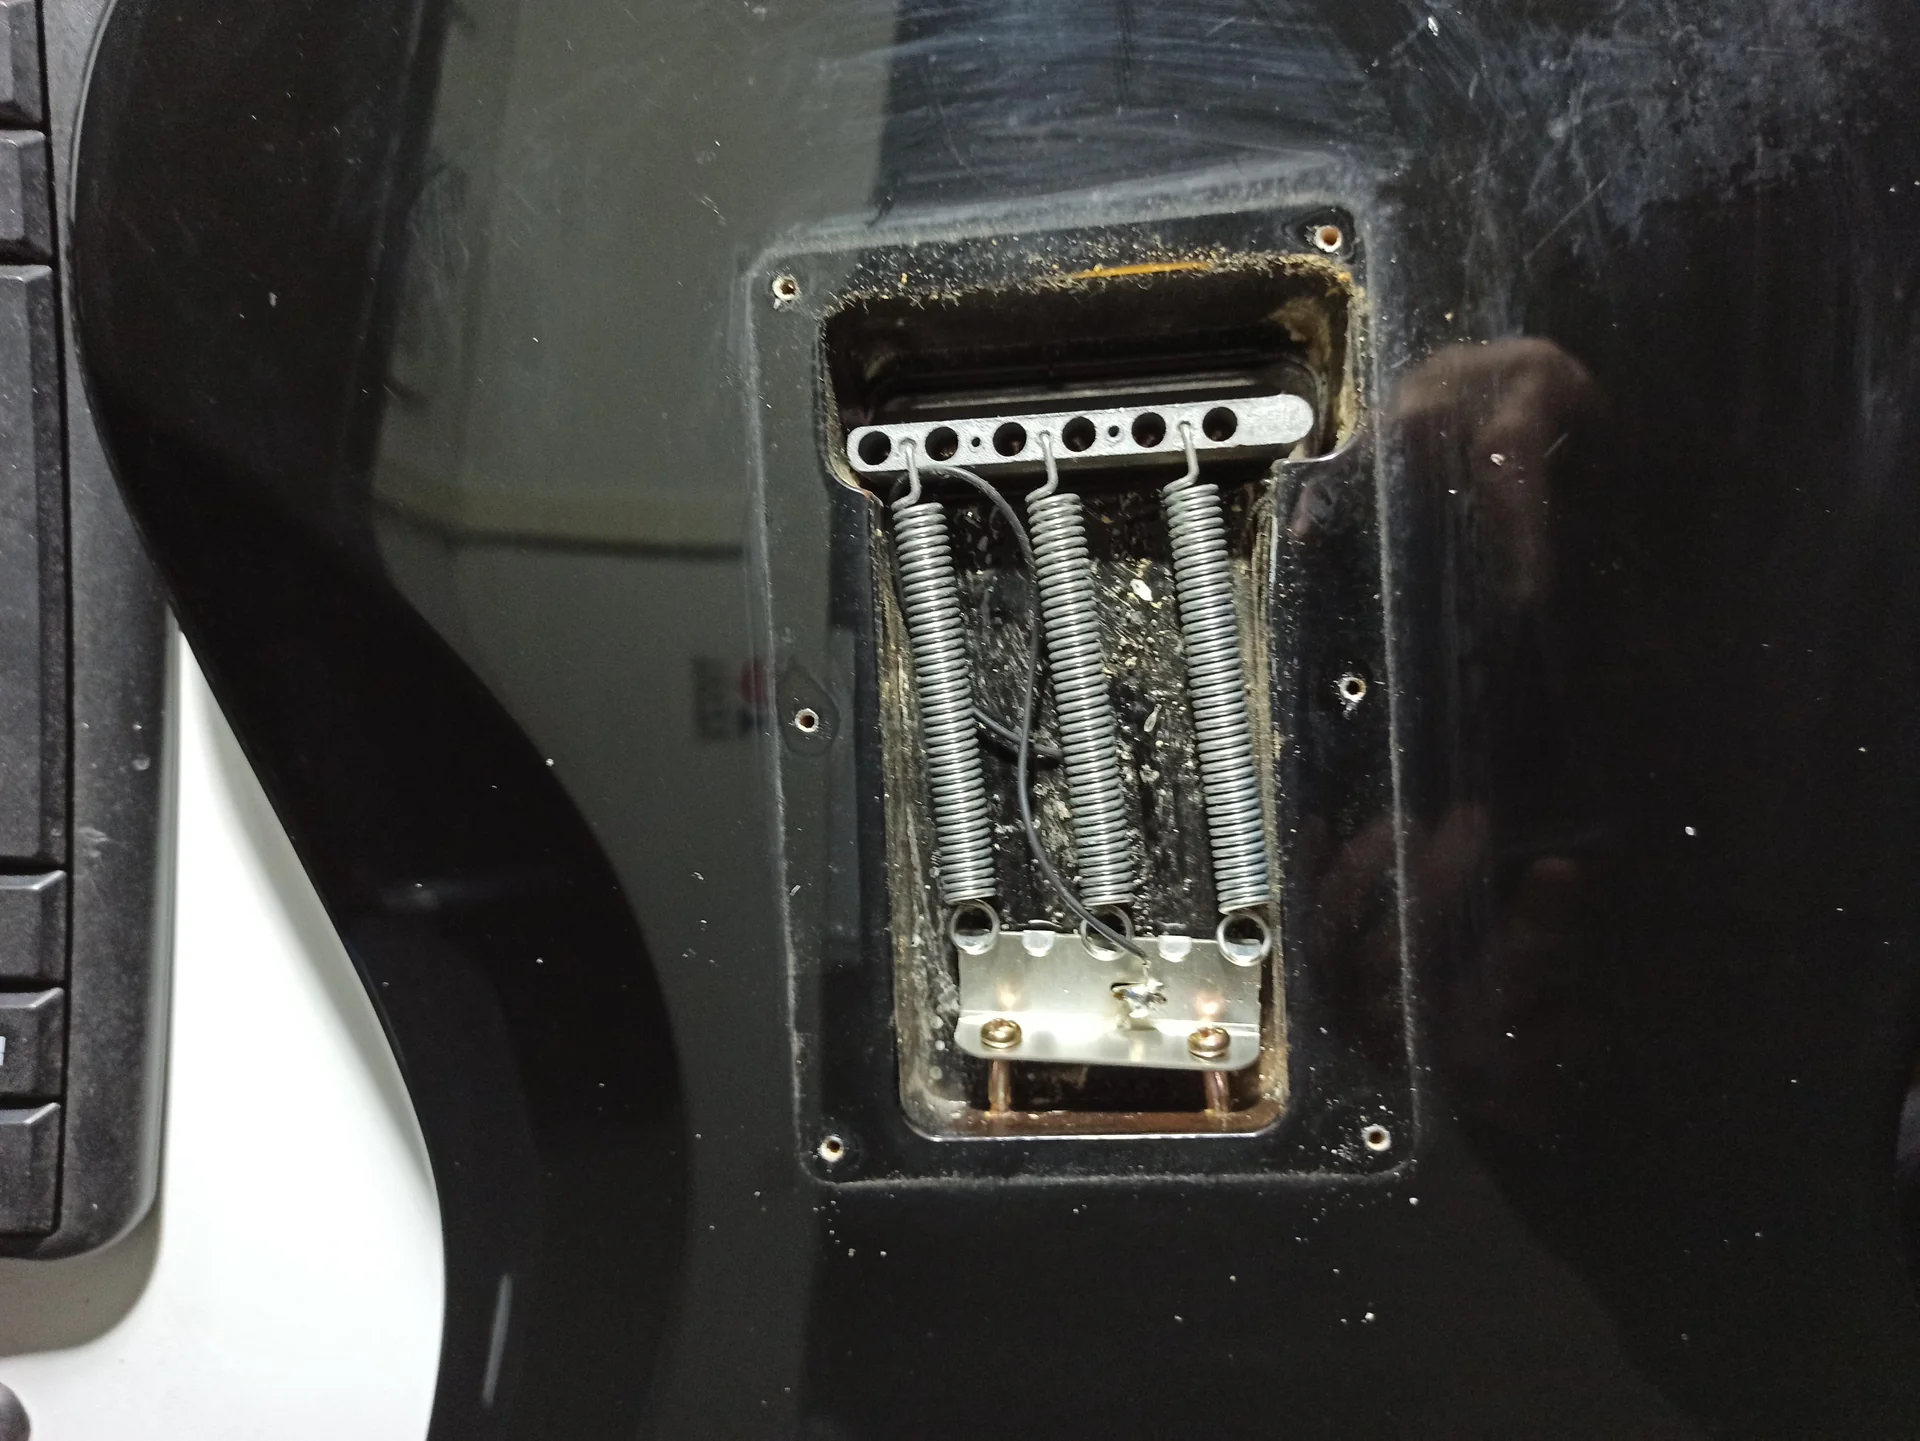
If you are building a body from scratch or installing a Wilkinson on a body that had a fixed bridge, you will need to rout the cavity for the tremolo block and for the springs. Rout the cavity: Use your template as a guide. If you have a Dremel with a routing base, go in thin layers. If you have a larger router, even better. The depth of the cavity must be sufficient to accommodate the tremolo block and allow bridge movement. Usually, we talk about 40-45mm deep for the block, and a little less for the spring cavity.Hole for the springs and the claw: This cavity is on the back of the body. Here too, use a template. The position must be such that the springs are perpendicular to the tremolo block when under tension. Advice from Mimmo: Don't rush. Rout a little, clean, check. If you've never routed before, practice on a scrap piece first. It's easy to cause damage here. And remember, you can always remove more wood, but you can't add it!
Drilling without damage: The crucial steps
This is the moment of truth. Precision here is everything. A crooked hole, and goodbye tremolo stability.The Pivot Holes (the tremolo “posts”)
These are the most critical holes. They are the ones that will house the metal bushings into which the bridge posts will be screwed. 1. Choose the right tip: Bushings have a specific diameter. Measure them with a caliper and use a wood drill bit of the same diameter. If the bushing is slightly tapered, use the wider end as a guide. A slightly narrow hole is better than a wide one, because you can widen it, but not narrow it. 2. Mark the points: With the template firmly attached, use an awl to mark the exact center of the pivot holes. Don't rely on a pencil alone; the awl creates a small depression that guides the drill bit. 3. Drilling: With a drill press: Place the body flat on the drill stand and align the bit with the awl mark. Drill slowly, at medium speed, without pushing too hard. Pull the bit out and retract it to clean the sawdust.With hand drill: This requires a keen eye and a steady hand. Use a small magnetic level on the drill to ensure it's vertical. Start slowly. If you have a drill press, use it. A trick I've learned is to drill first with a smaller (pilot) bit to create a guide, and then with the final bit.n4. Depth: Drill to the depth indicated by the manufacturer's specifications for the bushings. Usually, the bushings should be flush with the body's surface, or slightly below. Do not drill too deep! You can put a piece of adhesive tape on the drill bit to mark the maximum depth.n5. Inserting the bushings: Once the holes are made, insert the bushings. Do not use a hammer unless strictly necessary and with protection between the hammer and the bushing. I use a woodworking press or a clamp, with two pieces of wood to distribute the pressure, to gently and slowly push them until they are flush. If they are too tight, you can slightly enlarge the hole with a slightly larger bit (like 0.1mm more) or with a hand reamer. Tip to avoid chip-out: When the bit is about to exit the opposite side of the wood, slow down and place a piece of scrap wood firmly pressed under the body. This reduces the chance of the wood chipping out.
The Holes for the Spring Claw
These holes are less critical for the bridge alignment, but still important for spring stability. 1. Position: The claw mounts in the rear cavity. Its position must be central to the cavity and perpendicular to the tremolo block line.n2. Mark the points: Position the claw and mark the points for the screws.n3. Pilot holes: Use a wood drill bit smaller than the diameter of the screws (a good starting point is about 70-80% the diameter of the screw). Drill shallow pilot holes. This prevents the wood from splitting when you screw in the claw screws. #4. Screw the claw: Screw the claw on, but don't tighten it completely yet.Ground: Where and How to Connect It
A good ground connection is essential to reduce background noise. The tremolo, being metallic, must be grounded. 1. Ground wire hole: Make a small hole (2-3mm) from the tremolo block cavity to the spring cavity. This hole will be used to pass the ground wire.n2. Ground wire: One end of the wire will be soldered to the tremolo claw (there's usually a designated spot), the other end must touch the tremolo block or one of the saddles. I usually make a small hole under the bridge, in the block cavity, and insert a piece of stripped wire that then gets “squeezed” by the tremolo block when I mount it. The important thing is that there is electrical contact.n3. Connection to the circuit: The ground wire from the claw will then be connected to the rest of the guitar circuit, usually to the back of the volume potentiometer or to a common ground point. Pain point solved: Grounding is one of those details that a beginner often forgets or underestimates. Then they complain about the “hum”. This small step makes a huge difference.Assembly and Initial Adjustment of the Wilkinson Bridge
Now that the holes are made and the bushings are in place, we can finally mount the bridge and start to see the guitar take shape.Mounting the Tremolo Block and Saddles
1. Assemble the bridge: Screw the tremolo block to the bridge (usually with three screws). Make sure it is firmly attached.n2. Mount the saddles: The saddles are the small parts where the strings rest. Screw them to the bridge without overtightening, so they can move for intonation adjustment. Make sure the intonation screw springs are in place.Install the Bridge on the Body
1. Screw in the pivot posts: Insert the pivot pins (the posts) into the bushings you previously mounted in the body. Make sure they are screwed in firmly but without excessive force. They must be at the same height.n2. Place the bridge: Place the Wilkinson tremolo on the posts. It should swing freely without play or strange noises. If you feel friction, check that the posts are screwed in at the same height and that the bushings are flush.n3. Insert the springs: In the back cavity, attach the springs to the tremolo block and the claw. The number of springs (usually 3-5) depends on the string tension you will use and how “hard” or “soft” you want the tremolo to be. I usually start with 3 parallel springs for a floating setup.String the Guitar for Initial Tension
This is a crucial step for adjustment. You cannot adjust a tremolo without string tension. 1. String: Mount the strings on the guitar. You don't have to tune them perfectly right away, but bring them to a tension sufficient to hold the bridge in place.n2. Spring adjustment: This is the most delicate part. The goal is to balance the string tension with the spring tension.Floating Tremolo: If you want a tremolo that allows you to both “pull up” the notes (pull up) and “lower” them (dive bomb), the bridge must be “floating”. This means that the bridge does not rest on the body, but “floats” in a horizontal position, perfectly balancing the string tension with the spring tension.
To achieve this, screw or unscrew the claw screws until the bridge is parallel to the body. It takes patience, string, adjust, tune, and repeat.
Dive-Only Tremolo: If you prefer a tremolo that only allows dive bombs (like a vintage tremolo), you can tighten the springs so that the bridge rests slightly on the body. This increases tuning stability, but does not allow you to pull up the notes.
My garage trick: For a quick floating setup, I place a 9V battery or a 9-10mm piece of wood under the back of the bridge, between the bridge and the body. Then I tighten the claw screws until the bridge lightly presses on this shim. I remove the shim, and usually I am very close to the desired floating setup. Common mistake: Many people tighten the springs haphazardly, or don't understand how the balance works. The result is a tremolo that won't return to its original position, or a guitar that easily goes out of tune. Take your time here.
Adjusting the Saddle Height (Action) and Intonation (Intonation)
Once the bridge is more or less balanced, you can move on to fine adjustments. 1. Action (string height): Use the two small screws on each saddle to adjust the string height. Start at a comfortable height and then gradually lower it until you hear the strings buzzing. You can measure the height with a feeler gauge: typically, it starts at 1.5mm for the high strings and 2mm for the low strings at the 12th fret. Intonation: This is essential for playing in tune across the entire fretboard.Tuning: Tune your guitar accurately.
Check the intonation: Play the string open and then at the 12th fret (harmonic and fretted). If the note at the 12th fret is sharp, you need to lengthen the string, so move the saddle. backwards (towards the back of the body) by unscrewing the intonation screw. If it's flat, you need to shorten the string, so move the saddle after you (towards the neck) by screwing the screw.
Repeat for each string. It's an iterative process: every time you adjust a saddle, the general tuning might change slightly, so you'll need to retune and recheck. Patience: Intonation is a process that requires time and precision. Don't get discouraged if it's not perfect on the first try. Here too, practice makes perfect.
Common Problems and Garage Solutions
Not everything always goes smoothly. I've faced these problems a thousand times and learned a few tricks.The Tremolo Doesn't Return to Position / Tuning Problems
This is the number one problem with tremolos. The causes can be various: Friction at the nut: If the strings get stuck in the nut, the tremolo will not return to position. Make sure the nut grooves are well lubricated (pencil graphite is an excellent lubricant if you don't have specific products) and that they are the right size for the strings.Friction on the saddles: Here too, lube. The saddles of the Wilkinson tremolo They're well made, but a little graphite never hurts.
Tremolo springs: Too tight or too loose. Recheck the balance between string tension and springs. Sometimes, adding an extra spring or changing their arrangement (for example, a "V" instead of parallel) can help.
Pivot screws: If the pivot pins are not screwed in at the same height, or if they are too tight/loose in the bushings, they can create friction. Check that they are flush and free to rotate.
Mechanics: If the tuners are of low quality or don't hold tuning well, the tremolo will always be a nightmare. Consider an upgrade if the problem persists.
New strings: New strings take a while to “stabilize”. Stretch them a bit after installing them, and you'll see that the tuning will improve.
Screws that Don't Hold
If a screw (of the claw, of the saddles) doesn't hold, it means that the hole is too wide or the wood is stripped. Quick solution: Put a toothpick (or more than one) with a bit of wood glue in the hole, let it dry and then re-drill a small pilot hole. The glue and the toothpick will fill the hole, giving new grip to the screw. It's a classic “garage trick” that works.Strange Noises from the Bridge
Vibrating springs: Sometimes the springs can vibrate and make noise. You can insert a small piece of foam rubber or felt between the springs to dampen the vibrations.* Loose parts: Check that all screws are tight, but don't overdo it.
When to Give Up (or ask for help)
Look, I've broken more screws than I can count, and I've chipped enough wood to build myself a guitar made only of mistakes. If a step blocks you, if you feel like you're about to make a mess, stop. Take a break. Reread the instructions. Watch a video on YouTube. Ask for advice on a forum (Reddit is full of people willing to help!).Sometimes, starting over is the only solution. Maybe it means buying a new body or a new tremolo, but it's part of the DIY game. Every mistake is a lesson learned. And I assure you that the satisfaction of seeing your wilkinson guitar tremolo perfectly working, after sweating blood and tears, pays off for everything.
If you then want to delve deeper into how modify your guitar in other ways, perhaps with different pickups or electronics, well, that's another chapter. But in the meantime, enjoy your vibrato!
An excellent resource for bridge specifications and technical drawings (including Wilkinson) is the Allparts or Gotoh website. For example, for technical details and specific models, you can take a look here: Allparts Tremolo Bridges Info and Dimensions. Always check the exact model you have.
In short, installing a wilkinson tremolo it's no small feat, but it's not science fiction either. It takes method, attention to detail, and the awareness that some mistakes are bound to happen. But when your vibrato finally works properly, and you can do your first dive bombs or pull-ups without the guitar going out of tune, you'll feel that satisfaction that only DIY can give you. And you'll understand that if I did it, you can do it too. Just try!
See also
Download the Luthier Survival Kit
Free PDF with checklist, problem-cause table and project card template.
 English
  Italiano
Stuck on your build?
If you ran into the same problem or have a question, drop it in the comments. I read and reply to every one.
Write a comment