

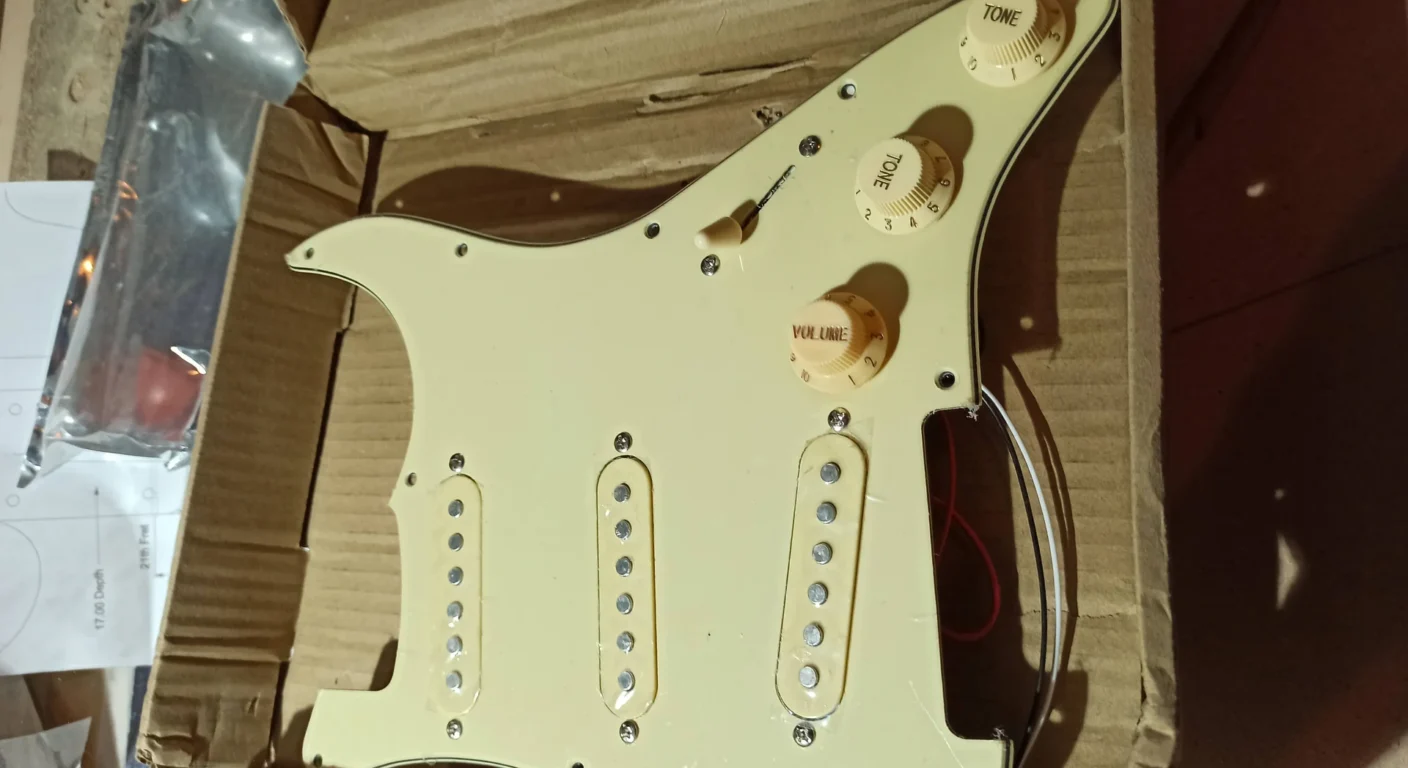
Installing a Guitar Pickguard: Without Mistakes
Mount a pickguard on the guitar. Seems like nothing, right? Four or five screws, and off you go. Instead, believe me, it's one of those steps that can make you break out in a cold sweat. I still remember the first time I tried to mount one on a raw alder body. I was there, drill in hand, and the fear of making a crooked hole, or worse, of splitting the painted wood, paralyzed me. Every time I rested the bit, it seemed like I could hear the creaking sound even before starting. I was terrified. I didn't want to ruin weeks of work on the finish just for a moment of distraction. If you've also felt that way, or simply want to make sure you do a clean and smooth job, you're in the right place. I'm not a professional luthier with years of workshop experience. I'm someone who has built and repaired guitars in his garage, making mistakes, redoing things, and learning the hard way that with a little attention and the right tricks, even things that seem difficult become feasible. Here I will guide you step by step, not only on as to do, but also on Why certain steps are fundamental, and what mistakes have I made that you shouldn't make?.
Why the Pickguard is Important (and not just for aesthetics)

If you want to delve deeper into modification and customization techniques, also read our guide on how to modify a guitar.
Before you start drilling and screwing, let's do a quick check of the tools. You won't need a super-equipped luthier's workshop, but a few targeted tools will save you a lot of headaches. Here's what I've learned to keep handy: The new pickguard: It seems obvious, but make sure it's the right one for your guitar model. There are thousands of variations of Strats and Teles, with different numbers of holes, slightly staggered pickup positions, and so on. Check the specifications carefully or, if you can, compare it to your old one. Drill: A cordless drill is ideal. It gives you control over speed and torque, something a more powerful corded drill sometimes lacks. Precision is everything here. Drill Bits: You'll need small, sharp drill bits. A 1.5mm is a good starting point for drilling pilot holes. Make sure they're wood drill bits and sharpened to avoid chipping. Pickguard screws: They are usually included with the new pickguard, but if you use the old ones, make sure they are all in good condition and that the headstock is still intact to avoid stripping them. Punch or burin: Essential for precisely marking the exact spot where the screw will go and where you'll need to drill. A small guide hole will prevent the drill bit from "walking" on the wood. Paper tape (for bodywork): The blue or yellow one, with low adhesion. We'll use it to hold the pickguard in place and to mark the drilling points. It won't damage the finish and is easy to remove. Soft pencil: For marking. A carpenter's pencil works fine. Metal ruler or caliper: For precise measurements and to check alignments. Hand screwdriver: The right size for the pickguard screws. Avoid electric screwdrivers for final tightening; hand feel is essential here. Clean rag and mild degreaser: To clean the body surface before applying the pickguard. Optional, but recommended: stop collar or drill bit tape: It helps limit the drilling depth. You don't want to drill through the other side of the body, do you? I came close once, but luckily I stopped in time! Optional: thin double-sided tape or wallpapering tape: A small piece can help hold the pickguard in place during marking, especially if you're working alone. Having everything at hand will allow you to work calmly and without interruptions, reducing the possibility of errors. Remember, haste is the worst enemy of good lutherie work.
Pre-Installation: Setting the Stage Without Panicking


Ok, you have the tools, the new pickguard for the guitar that's where it's waiting for you. Don't rush in with the drill right away! The pre-installation phase is crucial and will save you a lot of headaches. This is where the foundation for a clean and precise job is laid. ### 1. Fit Verification: The Litmus Test The first thing to do is a simple mating test. Place the pickguard on the body without any screws. The neck pocket: Does it align perfectly with the handle (if already mounted) or its housing? There should be no excessive gaps or interferences. The pickup cavities: Do the pickup holes on the pickguard match the body cavities? It seems trivial, but I've seen "compatible" pickguards that actually required minor modifications to the cavities. The cavities of electronics: If your model has pickguard-mounted potentiometers and switches, make sure the holes in the pickguard line up with the recesses in the body that house the electronics. The bridge: If the bridge is fixed, check that the pickguard does not hit the saddles or studs. If there are small discrepancies, sometimes they can be resolved with a light filing on the edges of the pickguard. But if the differences are significant, perhaps you have the wrong pickguard. Better to find out now than after drilling the holes. ### 2. Mounting the Electronics (if applicable) This is a step that many skip, but which I strongly recommend. If your pickguard will house pickups, potentiometers, and switches (as in a Stratocaster), mount them Before to attach the pickguard to the body. Fix the pickups: Screw the pickups to the pickguard. Mount potentiometers and switches: Insert the potentiometers, selectors and jacks (if applicable) into their respective holes and secure them with the nuts and washers. Perform the welding: Now, with the pickguard still “free”, it's the ideal time to do all the soldering. It's much more comfortable to work on a pickguard that you can easily turn and handle, rather than bending over the guitar body. Follow your wiring diagram carefully. Once all the electronics are soldered and tested (a small continuity tester is your best friend here), you can move on to the next step. This prevents you from having to disassemble everything if you discover a desoldered wire after attaching the pickguard. ### 3. Shielding: A Detail That Makes a Difference If you haven't already, this is the perfect time to think about shielding. Many modern pickguards already have an aluminum layer on the back. If yours doesn't have it, you can add it yourself. Material: Copper or aluminum tape. Copper is slightly more effective, but aluminum works just fine. Application: Cover the entire inside surface of the pickguard, making sure the different pieces of tape overlap slightly to ensure electrical continuity. Grounding: Make sure the shielding layer is connected to ground. Usually, one of the potentiometers, when screwed to the pickguard, makes contact with the shielding and grounds it through the circuit. Check continuity with a multimeter. The shielding drastically reduces background noise and interference, especially with single coils. It's a bit of a tedious job, but one that pays off in terms of sound clarity. ### 4. Positioning and Alignment: The Critical Phase This is the moment when you decide if your pickguard It will be straight or crooked. Take all the time you need. Clean the body: Make sure the surface of the body is clean and free of dust or debris. Place the pickguard: Gently place the pickguard on the body, making sure it lines up with the neck pocket and edges. Align precisely: Use the neck pocket as your main reference. Check alignment with the bridge (if fixed). Make sure the pickups are centered in their cavities. Look at the edges of the pickguard relative to the edges of the body. There should be even gaps. Temporary fixing: Once you are satisfied with the alignment, use small pieces of paper masking tape to secure the pickguard in place. Place one near the neck pocket, one near the bridge, and perhaps a couple along the edges. This will prevent the pickguard from moving while you mark the holes. This step is crucial. A crooked pickguard is not only unsightly, but can also cause problems with pickup alignment or access to controls. Don't rush, move, reposition, check from every angle. It's a bit like hanging a picture: a millimeter makes all the difference. ## Drilling: The Moment of Truth (without drilling where you shouldn't!) Here we are at the point that makes many anxious: drilling the body. This is where precision and caution pay off. Remember my initial anecdote? The fear of ruining everything is real, but with the right technique, it will go smoothly. ### 1. Marking the Drilling Points with Precision With the pickguard Once the screws are securely taped and the alignment is checked, it's time to mark the spots where the screws will go. Use a punch: Take your punch or chisel and, using light pressure, create a small indentation in the center of each pickguard hole. This will create a guide for the drill bit, preventing it from "walking" on the wood. Double check: After marking all the points, you can remove the pickguard and check that all the marks are clearly visible and, above all, that they are in the exact center of where you would like the screw to go. If a mark doesn't convince you, clean it and redo it. This step is critical. If the drill bit slips, the hole will be crooked or out of place, and you'll have an extra nice hole on the guitar body. ### 2. The Choice of Drill Bit: Don't Underestimate This Detail The size of the drill bit is fundamental to avoid splitting the wood or, conversely, having screws that are too loose. Golden rule: The drill bit for the pilot hole should be slightly smaller than the diameter of the screw shank (the unthreaded part). Practical example: The most common pickguard screws have a diameter of about 2.5mm (corresponding to a standard American #4). For these, a 1.5mm or 1/16" bit is usually perfect for the pilot hole. If the screw is thicker, you could use a 1.8mm. Test on scrap piece: If you are not sure, take a piece of scrap wood of the same type as the body (or similar) and try drilling with different bits and screwing in a screw. You will immediately feel what the right size is: the screw must enter with some resistance, but without excessive effort. A bit that is too large will not give the screw enough “grip” in the wood. A bit that is too small will require too much force to screw in, risking splitting the wood or stripping the screw head. ### 3. Drilling Depth: Don't Drill Through to the Other Side! This is the mistake I almost made myself. It seems obvious, but in enthusiasm it's easy to overdo it. Measure the screw: Measure the length of the screws you will use. Use a “stop collar”: The safest way to control depth is to use a “stop collar,” a small ring that attaches to the drill bit and prevents it from going beyond a certain depth. Homemade alternative: If you don't have a stop collar, you can wrap masking tape around the drill bit, leaving only the length needed for the screw exposed. Leave a small safety margin (1-2 mm more than the length of the screw) to ensure the screw tightens properly. Technique: Set the drill to a low speed. Place the bit on the punch mark and start drilling with constant but not excessive pressure. Let the bit do its work. Do not “push” the drill. Drilling too deep is a disaster. Drilling too shallow means the screw won't tighten properly. The correct depth is one that allows the screw to firmly grip the wood without protruding from the other side or splitting the body. ### 4. The Drilling Order: Strategy for Perfect Alignment Do not drill all holes randomly. There is an order that helps you maintain impeccable alignment. Start with the key points: Drill the first two or three holes, which are most critical for alignment. Typically, one near the neck pocket, one at the opposite end (near the bridge), and one halfway along one side. Temporarily screw: Gently screw in these first two or three screws. Don't tighten them to death, just enough to hold the pickguard in place. This is your final checkpoint. Check again: Now that the pickguard is secured in a few places, do a final visual check for overall alignment. If anything isn't right, you can still loosen and reposition it. Drill the remaining ones: Once satisfied, drill all the other holes, one by one, and gently screw in the screws as you go. This method gives you greater control and allows you to correct any small deviations before they become permanent. I learned this technique after a pickguard had slightly shifted while drilling all the holes in sequence. It's no fun having a crooked pickguard and unused holes! ### A little trick: countersinking For screws with a countersunk head (those that need to sink slightly into the pickguard to be flush), a small touch of countersinking on the pickguard itself can make a difference. Use a slightly larger drill bit (but much larger than the pilot hole) and, by hand, gently rotate it in the pickguard hole to create a small cone. Be careful not to overdo it, just a touch to accommodate the screw head. This will ensure the screws sit perfectly flush, for a cleaner look. ## Screwing in the Pickguard: The Final Touch (and some tricks to avoid ruining everything) You have drilled all the holes, you have checked the alignment. Now it’s time to screw in the guitar pickguard definitively. It seems like the simplest step, but this is where mistakes can be made that ruin the work done so far. ### 1. Choose the Right Screwdriver It seems trivial, but using the wrong size screwdriver is one of the main causes of stripped screws or damaged heads. Perfect fit: The screwdriver tip must fit snugly into the slot or recess of the screw. If it's too small, it will slip. If it's too large, it won't fit or will damage the head. Hand screwdriver: For final tightening, forget electric screwdrivers. The sensitivity of your hand is the only thing that can tell you when a screw is tightened to the right point. ### 2. The Tightening Order: Balancing Tension As with drilling, the order in which you tighten the screws can also make a difference. Central or opposite screws: Start by screwing in the screws you used as reference points when drilling (one near the neck, one near the bridge, etc.). Tighten them gently, just enough to get them to grip. A “cross” or a “star”: To distribute the tension evenly, proceed by screwing the screws alternately or in a “star” pattern. Do not tighten one screw completely before moving to the next. Screw all screws until they feel slight resistance, then go back and gradually tighten them to the final torque. Final tightening: Tighten the screws until the pickguard is firmly in contact with the body, but without forcing it. Feel the point where the screw “stops”. Do not go further. I learned the hard way that overtightening can split the wood, strip the hole, or even slightly deform the pickguard. ### 3. Do Not Overtighten: The Silent Enemy This is the most important advice I can give you. The pickguard screws should not be tightened with the force of a wheel bolt. Sensitivity: You should feel when the screw has engaged and the pickguard is secure. There's no need to apply any additional force. Risks: Stripping the hole: If you overtighten, the screw threads “eat” the wood, and the hole strips. The screw will no longer grip. Splitting the wood: Especially on soft woods or near the edges, excessive pressure can cause cracks. Deforming the pickguard: A plastic pickguard can deform slightly if the screws are too tight, creating a wavy surface. Breaking the screw: Some screws are delicate and can break in half if forced. If you feel the screw offering too much resistance before it's flush, stop. It could be that the pilot hole is too small, or that something is obstructing the path. Never force it. ### 4. What to Do if a Hole Strips (It Happens, Don't Panic) Ok, you've overtightened, or the wood was already weak, and a hole has stripped. The screw spins freely. It's not the end of the world, it's happened to everyone! Here's how I solved it: Toothpicks and glue: Take a wooden toothpick (cocktail sticks work great) or a small piece of softwood strip. Dip it in PVA glue and insert it into the stripped hole. You can use two or three if the hole is very large. Let it dry: Let the glue dry completely (at least a couple of hours, better still overnight). Cut off the excess: Once dry, trim the excess toothpicks flush with the surface of the bodysuit. Re-drill and screw: Now you have a hole filled with wood and glue. You can redo a small pilot hole (with a slightly smaller drill bit than before, if possible) and screw in the screw. The glue will firmly hold the new “wood plug”, and the screw will grip again. This trick is a lifesaver and works almost always. It's a garage classic that solves a lot of problems for you. ### 5. Final Checks Once all the screws are tightened and the pickguard is firmly in place: Visual inspection: Check that all the screws are flush and that the pickguard is perfectly flat and aligned. Electronic test: If you have installed the electronics, connect the guitar to the amplifier and test all the pickups, potentiometers, and the switch. Make sure everything works correctly and and that there are no strange noises. Congratulations! You have just assembled your pickguard like a true DIY professional. It wasn't that difficult, was it? It only requires patience and attention to detail. ## Project Roadmap: From Incomplete Pickguard to Ready Guitar
Mounting a pickguard is a step that is part of many guitar building or restoration projects. To help you plan, here is a roadmap with the fundamental stages:
- Phase 1: Planning and Preparation (1-2 hours)
- Purchase of the correct pickguard and screws.
- Gathering of all necessary tools.
- Reading this guide to familiarize yourself with the steps.
- Phase 2: Pre-Installation and Electronics Assembly (2-4 hours, variable)
- Checking the fit of the pickguard on the body.
- Mounting of pickups, potentiometers, switches on the pickguard (if applicable).
- Performing the soldering of the electronics.
- Application of shielding (if necessary).
- Preliminary test of the electronics.
- Phase 3: Drilling and Alignment (1-2 hours)
- Body cleaning.
- Precise positioning and alignment of the pickguard.
- Temporary fastening with tape.
- Marking the drilling points with the punch.
- Drilling pilot holes, following the strategic order.
- Countersinking of the screw holes (if necessary).
- Phase 4: Final Tightening (30-60 minutes)
- Gradual tightening of the screws, following a star/cross pattern.
- Final tightening with sensitivity to avoid damage.
- Correction of any stripped holes with the toothpick/glue method.
- Phase 5: Final Checks (30 minutes)
- Visual inspection of alignment and screws.
- Full electronics test by connecting the guitar to the amplifier.
- Final adjustments if necessary.
Indicative Costs: How Much Does It Cost You to Have a Perfect Pickguard?
The cost to install a pickguard can vary significantly depending on what you need to buy. Here's an estimate:
- Pickguard: From 15€ to 50€ (for standard models, custom or high-end ones may cost more).
- Pickguard screws: Usually included with the pickguard. If you need to buy them separately, a set costs about 5-10€.
- Drill Bits: If you don't have them, a set of good quality wood drill bits can cost from 15€ to 30€.
- Punch/Awl: A good punch costs about 10-15€.
- Paper tape: A roll costs about 5€.
- Wood glue (PVA): A small bottle costs about 5€.
- Toothpicks: You already have them in the kitchen!
- Stop collar (optional): About 10-15€.
- Copper/aluminum tape for shielding (optional): A roll costs about 10-20€.
So, for a “basic” installation without shielding, you could get by with 30-60€ if you need to buy most of the tools. If you already have the tools, the cost is reduced to just the pickguard and screws.
Essential Tools: Your Pickguard First Aid Kit
We've already mentioned the tools, but let's summarize those that are truly critical to avoid mistakes:
- Cordless drill with speed control.
- Wood drill bits of various small sizes (especially 1.5mm and 2mm).
- Punch or awl to mark drilling points.
- Paper tape (automotive, low tack).
- Hand screwdriver of the correct size for the pickguard screws.
- Ruler or caliper for precise measurements.
- Soft pencil.
Remember, the quality of the tools, especially the drill bits, makes a big difference. Well-sharpened bits cut wood cleanly, avoiding splinters and excessive effort.
Common Mistakes to Avoid: The “What NOT to Do” Guide
I learned these lessons the hard way, often with some small disaster to fix. Avoid them!
- Not checking pickguard compatibility before starting.
- Drilling without first marking the spot with a punch, letting the drill bit slip.
- Using a drill bit that is too large for the pilot hole, causing screws not to grip.
- Drilling too deep, drilling through to the other side of the body.
- Overtightening the screws, splitting the wood or stripping the hole.
- Using the wrong size screwdriver, damaging the screw head.
- Screwing all screws all the way in before trying them all, making it difficult to correct small misalignments.
- Ignoring the shielding if noisy single coil pickups are used.
Whenever you feel unsure, stop for a moment, breathe, and reread the passage. Better to lose five minutes than to ruin hours of work.
Conclusions: The Satisfaction of a Job Well Done
Mount the pickguard on the guitar is one of those steps that, at first glance, seem simple but hide pitfalls. The fear of drilling a crooked hole, ruining the finish, or stripping a screw is a feeling I've experienced too, more times than I care to admit. But as you can see, with the right preparation, suitable tools, and a bit of patience, every obstacle can be overcome. We've seen together the importance of a good pickguard, not just for aesthetics but also for the protection and functionality of the electronics. We've put together the essential toolbox, because you don't need a luthier's workshop to do a clean job. We dedicated time to pre-installation, from checking the fit to assembling the electronics and shielding, because preparation is half the work. Then we moved on to the most delicate phase, drilling, where precision in marking points and choosing the right drill bit are crucial. And finally, we screwed everything in, learning not to overtighten and how to remedy small (and common) errors like a stripped hole. Remember, DIY is a continuous learning journey. Every guitar you build or repair teaches you something new. Don't be afraid to make mistakes; errors are the best teachers. The important thing is to understand Why something didn't work and learn how to fix it. Now that you have all the tools and tricks of the trade, you have no more excuses. Get that body out, take your pickguard and get to work. You'll see that, with a bit of concentration, the result will give you enormous satisfaction. Now it's your turn! Good luck and good music!
For further insights into wood screw drilling techniques in violin making, a great resource is StewMac's guide: How to drill pilot holes for wood screws. They offer practical advice and reference tables for tip sizes, which are essential for avoiding problems.
FAQ
Can I use an electric screwdriver to mount the pickguard?
For final tightening, it's always better to use a hand screwdriver. This allows you to feel the right resistance and avoid overtightening, which can cause damage to the wood or the pickguard itself. The screwdriver can be useful for quickly driving screws until they meet resistance, but the final touch must be manual.
What happens if the pickguard doesn't align perfectly?
Small discrepancies can sometimes be corrected by lightly filing the edges of the pickguard. However, if the alignment is significantly wrong, it might mean that the pickguard is not compatible with your guitar model. In this case, it's better to check compatibility before proceeding with drilling.
Download the Luthier Survival Kit
Free PDF with checklist, problem-cause table and project card template.
 English
  Italiano
Stuck on your build?
If you ran into the same problem or have a question, drop it in the comments. I read and reply to every one.
Write a comment